Performance Guide
Expectations
The Phoenix Flavour is already optimised to run well, meaning most modern machines should be able to consistently hold a high framerate. In the 4.6 update, the focus has shifted slightly so that the base setup is no longer quite as light as it used to be. For that reason, I have written this guide on how to improve your framerate.
It must be said upfront that a “high, stable framerate” in modded Skyrim means steady 60FPS. Those among you who prefer 100FPS+ will likely be disappointed as this is not easy to achieve without very strong hardware. It is not recommended as going about 72-75FPS will, despite SSE Display Tweaks, lead to some physics wonkiness (even if it won’t break your game).
This guide exists for those struggling to achieve consistent 60 FPS.
You do not have to follow all steps: For example, if you really love 3D tree LOD and highly detailed distant terrain, you can hold on to your High + 3D Tree LOD DynDOLOD output. Instead, you can compromise with your ENB or grass overhaul choice, or regenerate your INI files with the recommended performance settings.
Generally speaking, the INI files and grass mods are responsible for most of TPF’s performance impact.
Wabbajack Users: You do not have to follow this guide. Your installation of TPF includes a Performance profile.
Why do I have low performance?
There may be various reasons which include:
- Playing at a high resolution (1440p or above): Any of the options will help. Definitely check the resolution scale option.
- Having a low amount of VRAM (4GB or less): Regenerate DynDOLOD on Medium with 2D tree LOD.
- AMD CPU and/or GPU: Install Cathedral Minimalist ENB or remove ENB altogether (ENBSeries is optimised for Intel/NVIDIA).
- Older/slower hardware in general: Any of the options will help.
Very Low-End PCs
If your hardware is very outdated (Skyrim SE minimum requirements or even below), you should definitely follow all steps. INIs on medium, DynDOLOD on low with 2D trees, and ReShade instead of ENB should help you attain a playable framerate, at least on 1080p. Scaling down the resolution may help further in making the game playable.
INI Tweaks
One reason why TPF always used to be very performance-friendly was because we ran BethINI (the INI configuration tool) with the Medium preset. This has since changed (High is the default now) so the first thing we can do is revert to those more conservative settings.
It should be noted that the visual degradation is not hugely noticeable, the difference in settings will mostly apply to distant objects. However, it should help you regain some frames (10FPS+).
Alternatively, there is also a single INI tweak that can already give your framerate a boost by itself.
Option 1: Block Level Tweak
The performance gain from regenerating INI files comes largely from a single setting. If you only need a few extra FPS and don’t want to lower visual quality by too much, you can start by tweaking this setting. As you can see in this comparison slider, you can regain about 6 FPS depending on your location.
- In Mod Organizer 2, open the INI Editor.
- Switch to the skyrimprefs.ini tab and scroll to the bottom.
- Under [Terrain Manager] change the value for
fBlockLevel1Distance=to32768. - Click the Save button at the bottom and close the window.
Option 2: BethINI Medium
First, restore the vanilla INI files to use as a base:
- Make sure Mod Organizer 2 is closed.
- Navigate to your Documents folder:
C:\Users\Your User Name\Skyrim Special Edition. - Copy the Skyrim.ini and SkyrimPrefs.ini inside (these are the default INIs).
- Navigate to your Profiles folder:
\Mod Organizer 2\profiles\The Phoenix Flavour\. - Paste the default INIs and overwrite the existing set in the folder.
It is possible to tweak the BethINI configured INIs you already had. I just always preferred to re-do it from scratch.
Next, re-run BethINI to adjust the vanilla INIs:
- Navigate to
\Your Modding Folder\Tools\BethINI\and double-click BethINI.exe. - In the Setup tab, make sure the tool still points to your MO2 installation and TPF profile.
Edit the following settings in the Basic tab:
- In the Basic tab, make sure the Resolution matches your monitor’s resolution.
- In the Basic tab, check Recommended Tweaks and click Medium (under Presets).
- In the Basic tab, uncheck VSync and Lock Frame Rate.
Edit the following settings in the Interface tab:
- Uncheck Mod Manager Menu and optionally adjust your mouse sensitivity.
Edit the following settings in the Detail tab:
- Check Reflect Objects under Water.
- Set Godrays to
None. - Increase Particles to
7500. - Uncheck Lens Flare and Anamorphic Lens Flare.
- Increase Shadow Resolution to
2048 - Increase Shadow Bias to
0.7 - Increase Exterior Draw Distance to
8000. - Check Tree Shadows.
- Uncheck Ambient Occlusion.
Edit the following settings in the View Distance tab:
- In the View Distance tab, increase Grass Fade to
10000. - In the View Distance tab, lower Level 8 to
32768. - In the View Distance tab, increase Level 16 to
200000.
Edit the following settings in the Visuals tab:
- In the Visuals tab, lower Contrast to
-0.1800. - In the Visuals tab, increase Grass Diversity to 15.
Edit the following settings in the Custom tab:
- Select Section: Display, then Setting: bEnableLandFade, change the value to 0, and click Save.
Return to the Basic tab and click Save and Exit.
Re-open Mod Organizer 2.
Grass Overhaul
A major reason for the performance loss from TPF 4.5 onwards was the removal of Cathedral Landscapes. Its grass module, while not looking ideal in some places, is incredibly performant, completely unrivaled in that aspect. Thus, I recommend replacing Veydosebrom with Cathedral Landscapes grass if you struggle with a low framerate.
The good news is that you can keep Cathedral 3D Pine Grass which was made by the same author as Cathedral Landscapes, JonnyWang, and is also impressively performance-friendly.
First you need to disable the following mods in your mod order:
- Folkvangr - Grass and Landscape Overhaul
- Veydosebrom Regions
- Veydosebrom Regions - Fall Forest
- QW’s Grass Patch
Cathedral Landscapes
Download Instructions
- Main Files: Landscapes - Cathedral Concept
FOMOD Instructions
- Select Install: Grass Only
Additional Instructions
- Delete the following file(s) and / or folder(s):
Cathedral Landscapes.ini
All necessary grass-related INI tweaks are already covered in the BethINI instructions.
Cathedral Landscapes - Swamp Grass Alternative
Download Instructions
- Main Files: Cathedral Landscapes - Snow as Marsh Grass Addon
Mod and Load Order
- Place both new mods above Cathedral 3D Pine Grass in the mod order.
- Place the two new plugins above Cathedral 3D Pine Grass.esp in the load order.
This way, Cathedral 3D Pine Grass will overwrite Cathedral Landscapes and replace its pine grass.

Grass Density
By default, grass density is set to 20 if you kept the base TPF INIs or 40 if you regenerated on BethINI Medium. The way grass density works in Skyrim is that a higher INI value will result in less dense grass ingame and better performance. A lower grass density setting will give you more grass and worse performance.
For Cathedral Landscapes grass, I would recommend at least 40. If you continue to struggle with performance in grassy areas, you can increase the value further to regain more FPS.
- In Mod Organizer 2, open the INI Editor.
- In the skyrim.ini tab, scroll down to the
[Grass]section. - Increase the value for
iMinGrassSize=to anywhere between 40 and 60. - Click the Save button at the bottom and close the window.
Increasing the grass density beyond 60 will further improve performance, however, grass will become very sparse.
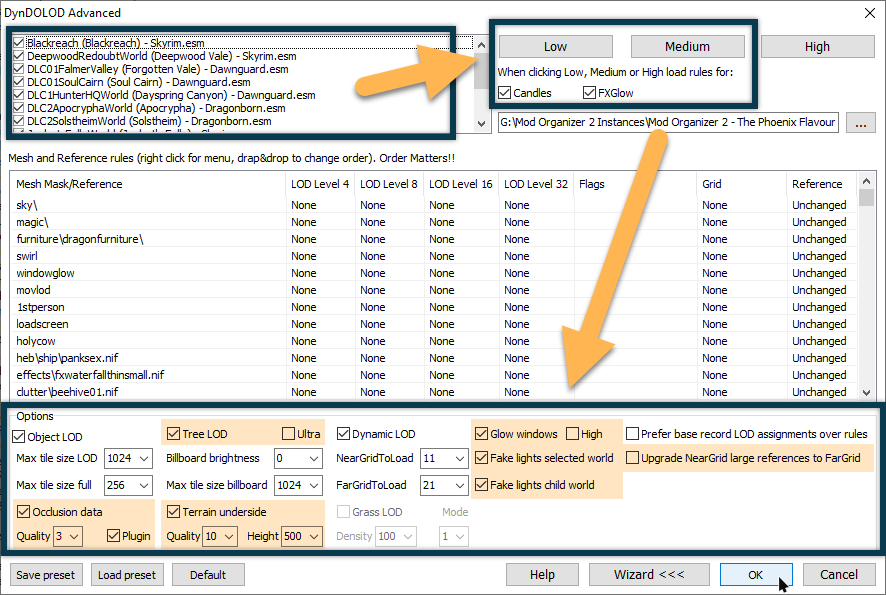
DynDOLOD
Another reason for performance loss is running DynDOLOD with the High profile and 3D tree LOD. The latter is especially heavy on VRAM so regenerating DynDOLOD with the Medium profile and 2D tree LOD is highly recommended if you have 4GB of VRAM or less.
Regenerating TexGen should not be necessary. You could, in theory, to lower the resolution of the LOD textures, but I do believe only regenerating DynDOLOD will yield a sizeable enough performance increase.
- Delete your current DynDOLOD Output in Mod Organizer 2.
- Temporarily disable DynDOLOD - Solstheim Ice Piles Fix under the PATCHER OUTPUT separator.
- Navigate to
\Your Modding Folder\Tools\DynDOLOD\Edit Scripts\DynDOLOD\Cache\. - Delete everything inside.
Regenerating DynDOLOD
By regenerating DynDOLOD, we will improve performance in two ways: We will be using mesh rules that are more performance-oriented (less detail), and we will generated regular tree LOD instead of 3D tree LOD. Especially the latter may improve your framerate by double-digit numbers.
- Run DynDOLOD through Mod Organizer 2 and click the Advanced button.
- Make sure all worldspaces in the top left box are ticked (right-click » Select all).
- Check the boxes for both Candles and FX Glow at the top right.
Now you need to select either mesh rules profile. For most people with mid-range PCs, I recommend Medium, however, if you have a very low-end PCs (SSE minimum requirements), selecting Low should eliminate DynDOLOD’s performance impact altogether while still improving distant terrain visually.
- Select either the Low or Medium profile.
- At the bottom make sure Generate tree LOD is checked (for 2D tree LOD).
- The Occlusion option with Quality
3and Plugin should still be checked. - The Terrain underside option with Quality
10and Height500should still be checked. - Check Glow Windows but leave the High box unticked.
- The Upgrade NearGrid large references to FarGrid option should also be unticked.
- Click OK to start generating LOD.
As usual, step away from your PC while DynDOLOD is being regenerated.
DynDOLOD Output
- Once DynDOLOD is done, click Save & Exit.
- Navigate to
\Your Modding Folder\Tools\DynDOLOD\. - Cut (CTRL+X) the DynDOLOD_output folder and paste it (CTRL+V) to
\Mod Organizer 2\mods\. - Refresh Mod Organizer 2 (F5) and it will appear at the bottom of your load order.
- Place it last below the PATCHER OUTPUT separator and activate it.
- Move DynDOLOD.esm below your other ESMs at the top of your load order.
- Leave DynDOLOD.esp and Occlusion.esp at the very bottom as the last plugin.
- Make sure all new plugins are activated.
- Re-enable DynDOLOD - Solstheim Ice Piles Fix under the PATCHER OUTPUT separator.
- Place the plugin below DynDOLOD.esp. Your load order should look like this:
 ”
”
ENBSeries
A major factor in performance loss is ENBSeries. While ENB presets are gamechangers visually, they typically come with a hefty performance impact, which can be adjusted in the ENB GUI. You can open it ingame by pressing F11 (opening the console ~ as well makes editing easier) and adjust various settings.
Two especially FPS-hungry settings, Depth of Field and Detailed Shadows, are already disabled by default in Serio’s ENB. Ambient occlusion also comes with a performance impact, however, I do not recommend disabling it in favour of Skyrim’s native ambient occlusion as that can produce a few visual bugs.
If Serio’s ENB is too performance-intense for you, I recommend swapping to Cathedral Minimalist ENB, a lightweight preset based on A Cathedralists ENB which in turn is based on The Truth ENB. The preset was made specifically for many of TPF’s baseline visual mods (Cathedral series) and is much closer to vanilla visually than Serio’s.
The alternative would be disabling ENB altogether.
Option 1: Minimal ENB for Obsidian Weathers
You can install the Minimal ENB for Obsidian Weathers preset just like you did Serio’s ENB in the ENBSeries step. Although it was made for a different weather overhaul, it will work perfectly fine with Cathedral Weathers as it does not change the colours.
- Manually download the main file from the Minimal ENB for Obsidian Weathers mod page.
- Open the downloaded archive and extract everything excecpt for the enbcache folder into
\Your Modding Folder\temp\.
Now add the preset to ENB Man:
- Open ENB Man and double-click the Skyrim SE instance.
- Disable your current ENB preset by clicking the red button at the bottom.
- Create a new profile and name it Minimal ENB for Obsidian Weathers.
- Drag and drop the preset files from your temp folder into ENB Man.
- Make sure the Binaries section is checked and the latest version of the ENB binaries are selected.
- Click the green button at the bottom to deploy your new ENB preset.
I recommend disabling Depth of Field (either directly in the enbseries.ini or through the ingame GUI which you can open with F11). I also tweaked the water settings and disabled the wetness reflection feature. Since the file has closed permissions, I cannot share my edits and you’ll have to apply them yourself.
Option 2: Removing ENBSeries
I do not recommend removing ENB altogether unless you either:
- dislike ENB regardless of preset, or
- you have very low-end specs (Skyrim SE minimum requirements or below).
If the latter applies to you, you are likely happy about every single frame you can regain. To remove ENBSeries (binaries and preset):
- Open ENB Man and double-click the Skyrim SE profile.
- Click the red button at the bottom to remove all ENB-related files from your root folder.
Deleting ENB altogether will mean that none of the ENB particle light meshes from the guide will work. Nor will you have ambient occlusion. However, you can re-enable Skyrim’s native ambient occlusion which is less performance-intense than ENBSeries ambient occlusion (nevermind a full preset).
To enable Skyrim’s native ambient occlusion:
- In Mod Organizer 2, open the INI Editor (Tools » Tool Plugins » INI Editor).
- Switch to the SkyrimPrefs.ini tab.
- Scroll down to the
[Display]section and setbSAOEnable=to1. - Click the Save button at the bottom and close the window.
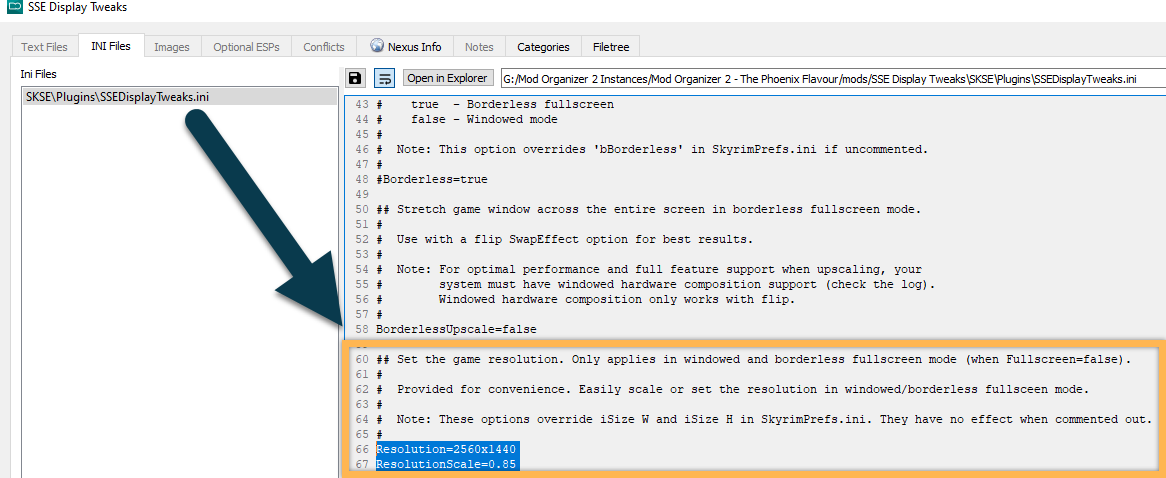
Resolution Scale
SSE Display Tweaks contains the option to downscale from your current resolution: For instance, you can play at 1440p but downscale by 0.9 to gain better performance while still having more detail than setting the game to 1080p.
Very high resolutions (4K) will always have a substantial performance impact and scaling down is recommended, especially if you don’t have the latest hardware.
Otherwise, using the resolution scale feature is only recommended if you truly struggle to achieve a playable framerate.
Adjusting the resolution scale
- Double-click SSE Display Tweaks in your mod order (below the ESSENTIAL MODS separator).
- Switch to the INI Files tab and select the SSEDisplayTweaks.ini.
- Scroll to Line 60 (the exact line may vary if SSE Display Tweaks updated recently) to the Resolution Scale settings.
- Uncomment the
Resolution=1920x1080line (remove the # sign) and set the resolution to the one you play at. - Uncomment the
ResolutionScale=0.75line (remove the # sign) and increase the value to0.85. - Press CTRL + S to save your changes and close the window.
Setting the resolution scale to a value below 0.85 will look very blurry ingame and is not recommended. You can also try 0.9 or 0.95 for slightly less performance gain and better visuals.