Skyrim and Steam
Spring Cleaning
If you ever modded Skyrim before, chances are you have left-over files in various directories. The first step in this guide is going to be cleaning those up as they can interfere with the TPF setup.
If you have Skyrim SE installed, please uninstall it now. Don’t skip this step, even if you never modded Skyrim.
I expect everyone to reinstall the game from scratch not only for clean-up purposes but also because the game must not be installed in a certain directory (more on that in a bit). Yes, in theory people who never modded the game COULD just Steam’s “Move install folder” option but this would bloat and complicate this page even more. Since the game is less than 13GB in size, I believe it is acceptable to ask everyone to redownload it from scratch.
Unfortunately, when uninstalling the game through Steam, only vanilla files will be removed while mod-added files will stay. If you did mod the game previously, please navigate to your Steam games directory which is probably C:\Program Files x86\Steam\steamapps\common\ and delete the Skyrim Special Edition folder if it is still there.
Documents Folder
If you literally just bought Skyrim SE and never ran it, this folder will not exists on your hard drive and you can skip to the next step.
Additional configuration files as well as your save games are stored in the Documents\My Games\Skyrim Special Edition directory. We will remove this folder also and then regenerate a fresh set of INI files later on.
- Navigate to
C:\Users\<Your User Name>\Documents\My Games\Skyrim Special Edition\.
If you have vanilla save files that you would like to keep, you need to back them up now. Copy the saves folder to Your Modding Folder\Backups\. From there you can restore it anytime you wish.
- Delete the
\My Games\Skyrim Special Edition\folder with all its contents.
Installation Directory
Before we can redownload the game, we need to make sure it can be installed in a suitable directory:
- Avoid UAC protected folders. UAC protected folders and their contents have higher security standards than other folders which can cause all kinds of issues for modding tools. To prevent any such issues from occuring in the future, never install any modding tools or the game under
C:\Program FilesorC:\Program Files x86.
Installing Skyrim SE or any related tools in an UAC protected folder will disqualify from getting support on our Discord server.
- Choose a hard drive with 150+ GB of free space. While it is highly recommend to install the modded game on an SSD for faster load times, be aware that a large amount of free space is required. This is because Skyrim SE and Mod Organizer 2 should be installed on the same drive. While the Skyrim SE base installation reaches around 13GB, your MO2 directory will eventually grow to around 90GB in size. If you can spare 150GB or more of SSD space, it is highly recommended you do so.
It is generally recommended to leave around 10-20% of your SSD space free for optimal performance and longevity.
New Steam Library
For the purposes of the guide I will refer to the Library in Steam as the Game Library. It is the second of four items in the top menu in Steam and contains a list of all your games.
A Steam Library on the other hand is a directory on your hard drive into which your Steam games are installed. By default this would be C:\Program Files x86\Steam\steamapps\common\. Since we do not want to have files inside an UAC protected folder like Program Files x86, we should not install Skyrim SE in the default directory. A new Steam Library is required.
If you already have a separate Steam Library outside the UAC protected folders on the drive you want to install Skyrim SE and Mod Organizer 2 on, you may use that and skip this step.
Otherwise follow the instructions below to create a new Steam Library:
- Open Steam and go into the Settings.
- In the Downloads tab, select Steam Library Folders.
- Click Add Library Folder.
- Point it to a location somewhere outside the UAC protected folders, for example
G:\Steam Library\. - Close all windows when you’re done.
It is important to note that Steam only allows one Steam Library per hard drive. However, there is a workaround: If you already have a Steam Library on your C:\ drive but inside a UAC protected folder and you want to have Skyrim and your modding files on the same drive, please check out LostDragonist’s Steam Library Setup Tool.

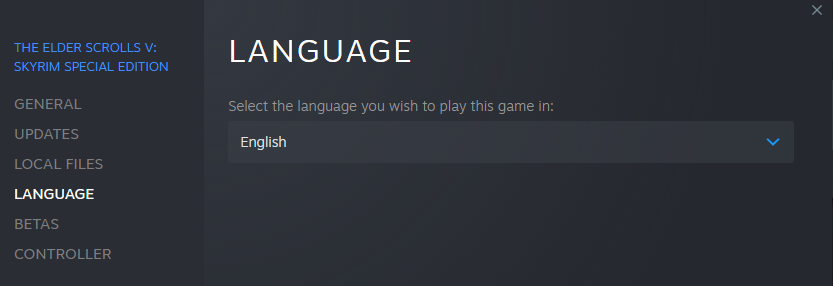
Game Language
Non-English installations are not supported. Skyrim SE must be set to English in Steam.
- Right-click The Elder Scrolls V: Skyrim Special Edition in your Steam games library.
- Select Properties and switch to the Language tab.
- Ensure that the language is set to English.
Reinstallation
- Find The Elder Scrolls V: Skyrim Special Edition in your Steam games library and click Install.
- As location, select the Steam Library you just created.
- Wait for Skyrim SE to be downloaded and installed.
Version Number
Because the Script Extender and certain other mods are version dependent, you must run a specific version of Skyrim SE. That is typically the latest version unless there was an update recently and the community hasn’t caught up yet in which case you need to roll back.
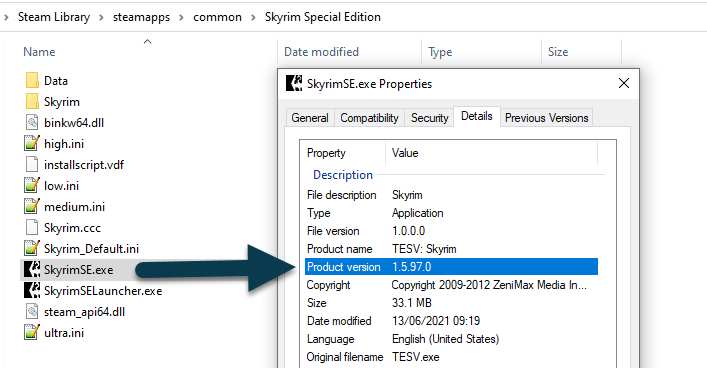
The currently supported version of Skyrim SE is: 1.5.97.
If you accidentally updated to a newer version, please refer to this guide here in order to roll back.
How to check version number
- Navigate to your root folder.
- Right-click SkyrimSE.exe and select Properties.
- Switch to the Details tab and check under Product version.
Disable Auto Updates
When Skyrim SE receives another update - which, thanks to the Creation Club, happens every once in a while - SKSE64 and all SKSE plugins will need to be updated as well. This usually takes at least a week.
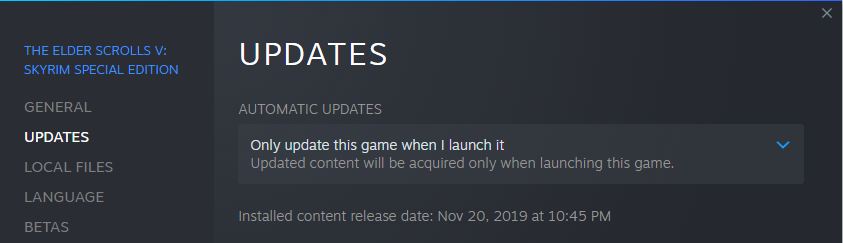
However, you can continue to play the previous version of Skyrim SE with SKSE64 and all your mods by simply setting the game to only update when launching it (through Steam). Since you start the game through the SKSE64 launcher, Steam will never update.
- Open Steam and find The Elder Scrolls V: Skyrim Special Edition in your Game Library.
- Right-click it, select Properties and switch to the Updates tab.
- Make sure Automatic updates is set to Only update this game when I launch it.
- Problem solved!
Executables Backup
Although Steam will no longer update Skyrim SE automatically, I still recommend keeping backups of the two executables (SkyrimSE.exe and SkyrimSELauncher.exe), just in case. If you accidentally updated, all you need to do to roll back is replace the executables in your root folder with the ones you backed up. This also comes in handy if you had to regenerate INI files or validate game files through Steam for whatever reason and were forced to update.
- Create a new folder:
Your Modding Folder\Backups\Skyrim SE 1.x.x(enter the current version number). - Copy the following two files from your root folder into the new directory:
- SkyrimSE.exe
- SkyrimSELauncher.exe
Creations
If you bought anything from the Creation Club (or grabbed “creations” while they were up for free), they will be re-installed alongside Skyrim SE. The guide does not support Creation Club content so you will have to move them away from the game files.
However, there are TPF Addons that do add Creation Club support. If you choose to install any of them later on, you will then be able to reinstall the respective “creations” as mods from your backups.
- Create a new folder:
Your Modding Folder\Backups\Creation Club. - Select all files beginning with cc (ESLs and BSAs) in your Data folder and hit CTRL+X.
- Navigate to your new Creation Club folder and paste them there (CTRL+V)
Disable Steam Overlay
This step is optional.
While I’ve never had any issues with the Steam Overlay in modded Skyrim SE, that seems to be an exception and it is indeed common practice to disable it as a precaution. Note that after following the instructions below the overlay will only be disabled for Skyrim SE, not for other games.
Since disabling the Steam Overlay will also prevent you from taking screenshots with Steam, I personally keep it enabled. YMMV.
- Open Steam and find The Elder Scrolls V: Skyrim Special Edition in your games library.
- Right-click it, select Properties.
- Uncheck Enable the Steam Overlay while in-game.
- Close the window.