Additional Tools
SSEEdit
- Download SSEEdit manually from the Nexus.
- Create a new folder:
Your Modding Folder\Tools\SSEEdit. - Open the downloaded archive and extract everything into the new folder.
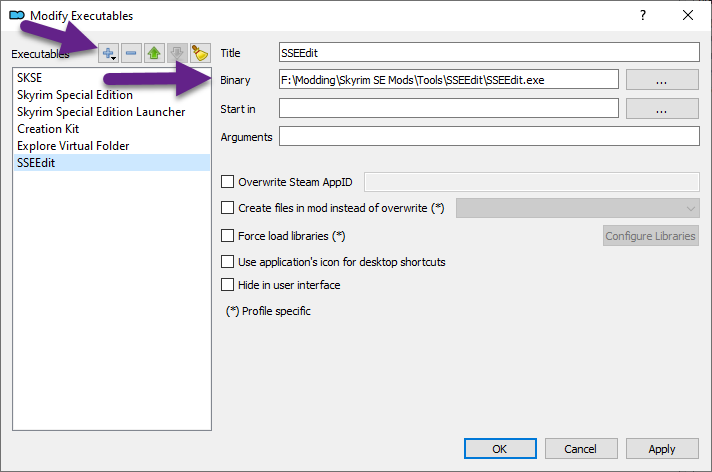
- Open Mod Organizer 2 and go into the Executables settings (Tools » Executables or CTRL + E).
- Click the tiny blue plus icon to add a new executable and select Add from file.
- Navigate to
Your Modding Folder\Tools\SSEEditand double-click SSEEdit.exe. - Click Apply to save the new executable.
SSEEdit Cache Output
Every time a new plugin is loaded into SSEEdit, a refcache file will be generated for it so that the next time it won’t have to processed again: SSEEdit can simply read the cache file, significantly shortening the startup time. Whenever you update SSEEdit, the accumulated refache files will also be wiped (as they should be) and new ones will be generated and stored in the same directory when you next launch SSEEdit without you having to complete any additional steps.
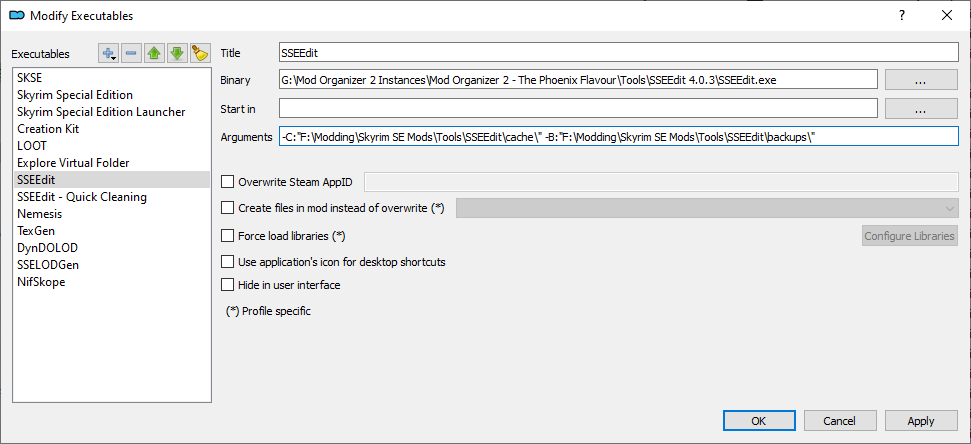
In order to store the cached files with the program files themselves, we need to add an argument for it:
- Under Arguments, enter the following:
-C:"...\Your Modding Folder\Tools\SSEEdit\cache\"
- Replace the "…\Your Modding Folder…" part with the file path on your end. This is what I added:
-C:"F:\Modding\Skyrim SE Mods\Tools\SSEEdit\cache\"
- Click Apply to save. Don’t close the window.
Note that the trailing backslash at the end is required - the file path MUST end on
\cache\.
SSEEdit Backups
After editing a plugin in SSEEdit, a backup will automatically be created. With another argument, we can define the location to which these backups will be saved to so that they are out of our way.
- In the Arguments line, after the cache argument, press Space once before adding the second command.
- Enter the following line after the first:
-B:"...\Your Modding Folder\Tools\SSEEdit\backups\"
- Replace the "…\Your Modding Folder…" part with the file path on your end. This is what I added:
-B:"F:\Modding\Skyrim SE Mods\Tools\SSEEdit\backups\"
- Click Apply to save. Don’t close the window.
Again remember that the trailing backslash at the end is required - the file path MUST end on
\backups\.
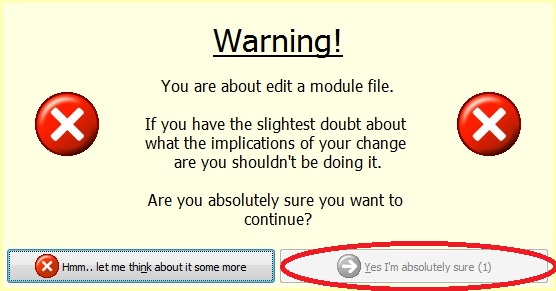
Disable Warning Window
Upon attempting to edit something for the first time each session, SSEEdit will display a warning with a 3 second delay before you can close it. However, while the tool has no “undo” button, that does not mean any edits are permanent: They are only applied to the plugin in question if you explicitly save them after closing the tool. For longer sessions, it is advisable to save the plugins you are working on periodically (but this is not something you will need to do during the setup of TPF).
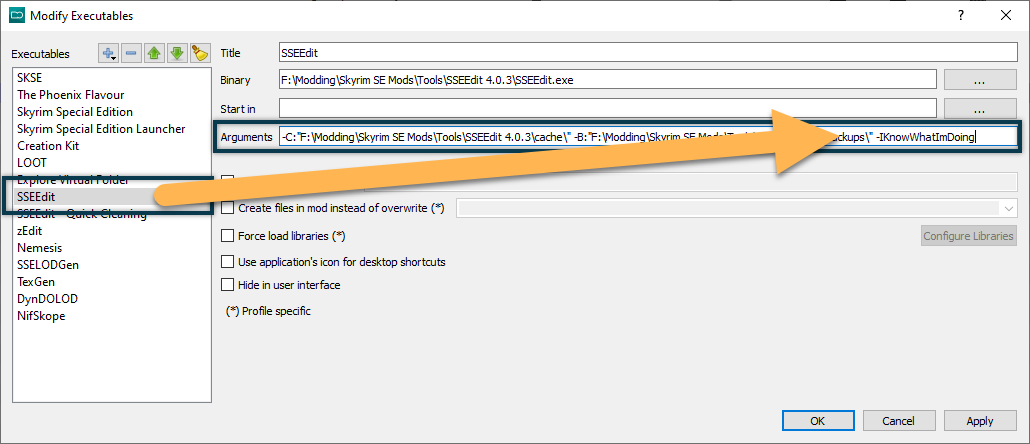
There is a command that you can add in the arguments for SSEEdit in order to disable the warning window. It will speed up the process of making quick edits such as the removal of a few records or flagging a plugin as ESL. I highly recommend adding it in your MO2 instance after the two arguments for backups and cache:
-IKnowWhatImDoing
Screenshot below shows some additional executables that you will not install until later on in the guide.
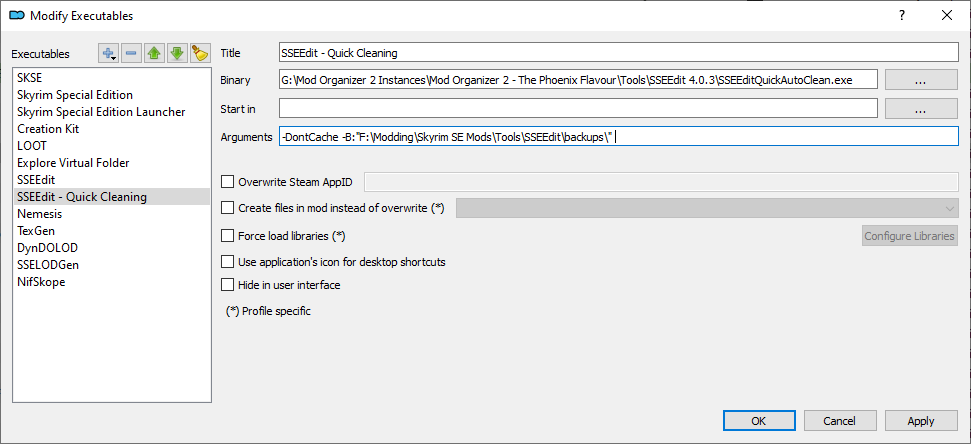
QuickAutoClean
- Click the tiny blue plus icon to add another new executable and select Add from file.
- Navigate to
Your Modding Folder\Tools\SSEEditand double-click SSEEditQuickAutoClean.exe. - Change the title to something less verbose (like “SSEEdit - Quick Cleaning”).
- Under Arguments, enter the following:
-DontCache -B:"...\Your Modding Folder\Tools\SSEEdit\backups\"
- Once again, replace the "…\Your Modding Folder…" part with the file path on your end (same as before).
- Click OK to save and close the window.
The -DontCache argument will prevent an obscure bug that destroys parts of Apocrypha during the cleaning of Dragonborn.esm.
Cathedral Assets Optimizer
Cathedral Assets Optimizer (CAO) by Gk1 is a unified asset processing tool that can be used to extract or create BSAs, optimize assets, compress or resize textures, and more.
Installation
- Download Cathedral Assets Optimizer 5.0.15 manually.
- Create a new folder:
Your Modding Folder\Tools\Cathedral Assets Optimizer. - Open the downloaded archive and extract everything into the new folder.
- Follow these instructions to add an exception for CAO to Windows Defender.
You will be using CAO plenty of times during the installation of the guide, so I recommend adding it to your Windows Taskbar for quick access.
We are using an old version because there have been some issues with the newer ones.
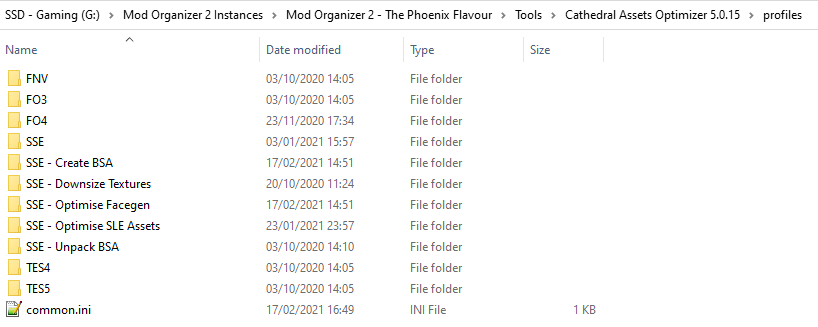
Profiles
Cathedral Assets Optimiser allows you to set up dedicated profiles. I created several profiles for different purposes to be used during the installation of the guide.
- Download the latest version of the Cathedral Assets Optimizer - Basic Profiles Pack manually from the Nexus.
- Open the downloaded archive.
- Extract all folders to
Your Modding Folder\Tools\Cathedral Assets Optimizer\profiles.
SSE NIF Optimizer
While the vast majority of SLE meshes can be fixed with Cathedral Assets Optimizer, there are some that will only work properly after running them through the original SSE NIF Optimizer.
- Download SSE NIF Optimizer manually from the Nexus.
- Extract the executable into Your Modding Folder. It’s just a single file so no separate directory is required.
NifSkope
NifSkope is a great tool that allows you to quickly edit meshes in various ways (although not create new ones).
- Download NifSkope from Github (scroll down to Assets and click the archive).
- Create a new folder:
\Your Modding Folder\Tools\NifSkope\. - Open the downloaded archive and extract its contents into the new folder.
In Mod Organizer 2, add NifSkope.exe as an executable like you did before with SSEEdit. No additional arguments are required.
