DynDOLOD
DynDOLOD and Performance
Contrary to popular belief, DynDOLOD is not inherently performance-intense. In fact, generating with the Low profile may even improve performance over vanilla in some places.
However, for TPF we are going to use the High preset with 3D tree LOD which is quite taxing, especially for people with 4GB of VRAM or less. Especially 3D tree LOD is a substantial improvement visually, however, as it replaces the vanilla 2D “cut-outs” with proper models for the leaves for a seamless transition.
If you find High + 3D tree LOD too intense for your system, there are instructions in the Performance Guide that you can try out after completing base TPF.
DynDOLOD Setup
- Open the Nexus page for DynDOLOD.
- Under Miscellaneous Files, download the latest version of DynDOLOD 3.00 manually.
- Navigate to
Your Modding Folder\Toolsand create a new DynDOLOD folder. - Open the downloaded DynDOLOD archive and move all files into your new directory.
TexGen Executable
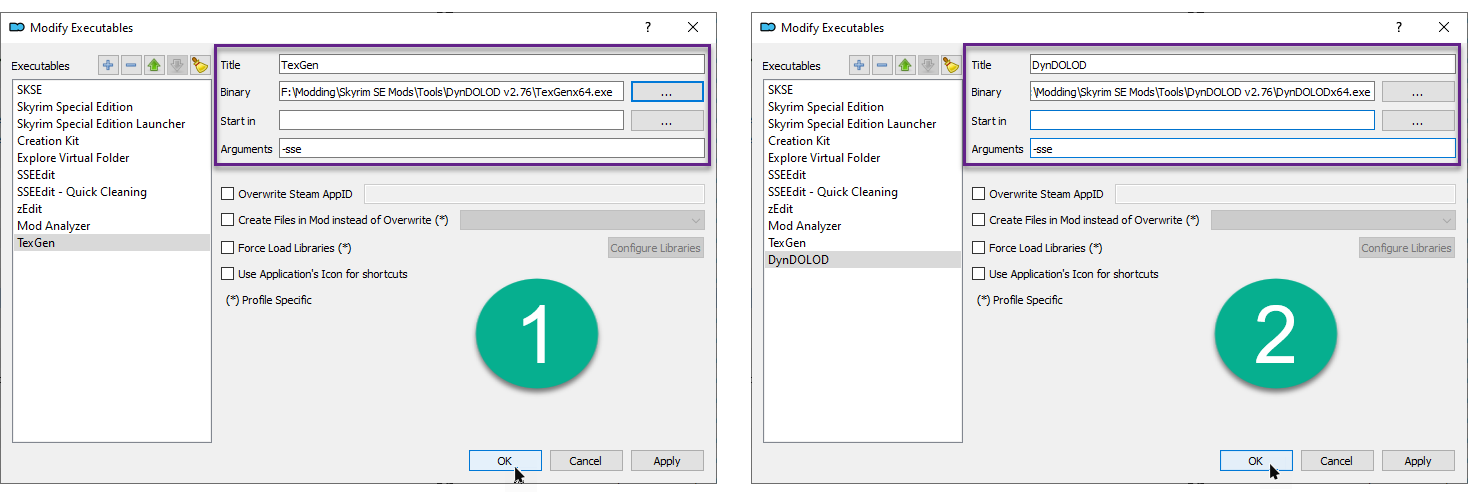
- Switch back to Mod Organizer 2 and open the Executables window (Tools > Executables or CTRL + E).
- Click the blue plus icon to add a new executable and select Add from file.
- Navigate to
Your Modding Folder\Tools\DynDOLODand double-click TexGenx64.exe. - Under Arguments, add
-sse.
DynDOLOD Executable
- Once again, click the blue plus icon to add a new executable and select Add from file.
- Navigate to
Your Modding Folder\Tools\DynDOLODand double-click DynDOLODx64.exe. - Under Arguments, add
-sse. - Click OK to save and close the Executables window.
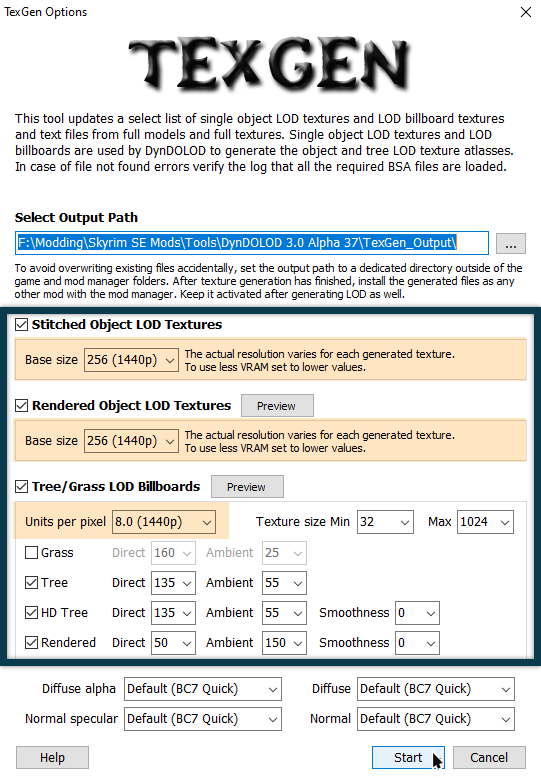
TexGen
- Launch TexGen through Mod Organizer 2.
- Under Stitched Object LOD Textures, set Texture size to
256(increase to512if you play at 4K). - Under Rendered Object LOD Textures, set Texture size to
256(increase to512if you play at 4K). - Set Units per pixel to
11(1080p),8(1440p), or5.5(2160p). - Under Trees/Grass Billboards, check the boxes for HD Tree (Trees and Rendered should already be checked).
- Click Start to begin the process.
The generation will take a while and I recommend you step away from your PC in the meantime.
TexGen Output
- Once TexGen has finished, click Exit TexGen.
- Navigate to
Your Modding Folder\Tools\DynDOLOD. - Cut (CTRL + X) the TexGen_Output folder and paste (CTRL+V) it to
Mod Organizer 2\mods. - Refresh Mod Organizer 2 (F5) and it will appear at the bottom of your mod order.
- Place it below the PATCHER OUTPUT separator and activate it.
DynDOLOD Generation
DynDOLOD has a multitude of features and settings through which performance impact and visual improvements can be balanced out. We are simply going to use the default high preset which has mesh rules already set up for hybrid 3D tree LOD.
Run DynDOLOD
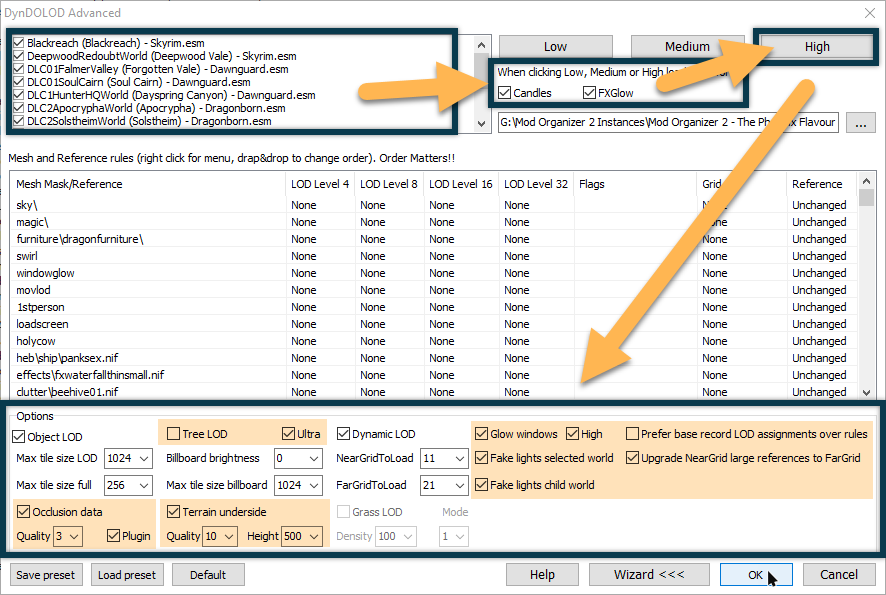
- Run DynDOLOD through Mod Organizer 2.
- Click Advanced to configure DynDOLOD.
- Make sure all worldspaces in the top left box are ticked (right-click » Select all).
- Check the boxes for both Candles and FX Glow at the top right.
- Click the High button to load the mesh rules preset.
- Increase Max tile size LOD to
2048if you play at 4K. - Increase Max tile size full to
512if you play at 4K. - Check the box for Ultra (this will uncheck Generate tree LOD as tree LOD will now be generated as object LOD).
- Make sure Occlusion Data and Plugin are checked. Set Quality to
3. - Make sure Terrain underside is checked. Keep the default settings for Quality and Height (
10and500respectively). - Check the boxes for Glow windows and High for glowing windows at a distance.
- Check the boxes for Fake lights selected worlds and Fake lights child world.
- Check the box for Upgrade NearGrid large references to FarGrid.
- Click OK to start the process.
Just like with TexGen, I recommend you step away from your PC until DynDOLOD has finished.
DynDOLOD Output
- Once DynDOLOD is done, click Save & Exit.
- Navigate to
\Your Modding Folder\Tools\DynDOLOD\. - Cut (CTRL+X) the DynDOLOD_Output folder and paste it (CTRL+V) to
\Mod Organizer 2\mods\. - Refresh Mod Organizer 2 (F5) and it will appear at the bottom of your load order.
- Place it last below the PATCHER OUTPUT separator and activate it.
- Move DynDOLOD.esm below your other ESMs at the top of your load order.
- Leave DynDOLOD.esp and Occlusion.esp as the final plugins at the bottom.
- Make sure both plugins are activated.
Solstheim Ice Piles Fix
For whatever reason, DynDOLOD reverts a change in the Skyrim Remastered - Ice and Glaciers plugin to vanilla. This in turn breaks some statics on Solstheim.
- Download and install the DynDOLOD - Solstheim Ice Piles Fix from the Optional Files section.
- Install it as usual in Mod Organizer 2 and active it in the mod order.
- Place the plugin below DynDOLOD.esp.
Check this comparison slider to see what the objects in question look like before and after the fix.
The bottom of your load order should now look like this:
