Creation Kit
Summary
This module covers the installation of the Creation Kit.
Prerequisite(s): Root Builder
Installation
The Creation Kit is Bethesda’s official modding tool which used to be available only from their proprietary launcher, but has since (mercifully) returned to Steam.
- Search for the Creation Kit in the Steam store.
- Make sure to select the Skyrim Special Edition: Creation Kit and install it.
As the location, choose the same Steam Library as for the game itself. The Creation Kit will be installed into the root folder.
Downgrading
Using the Creation Kit is a much better experience with SSE CreationKit Fixes. Unfortunately, the original mod is not updated for the newest version of the Creation Kit (the same issues of version dependency affect it that also affect the base game and SKSE). An unofficial update to the mod seems to have a few issues currently.*
**I was warned about this by friends who use the Creation Kit far more than I ever have and I am deferring to their expertise on the matter.*
To be on the safe side, I recommend rolling back to a previous version of the CK which is compatible with the original CK Fixes.
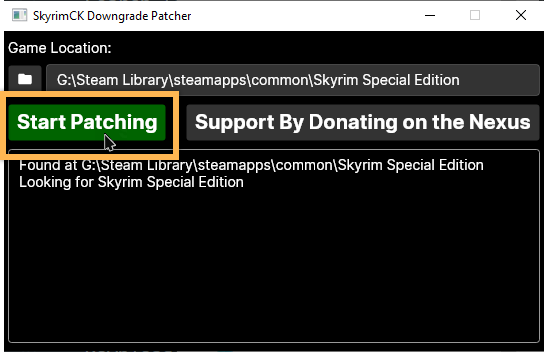
- Download halgari’s Creation Kit Downgrade Patcher.
- Save the executable into your root folder and run it.
- Click Start Patching.
The process should only take a second. Close the window when it’s done and delete the patcher.
MO2 Integration
Steam AppID
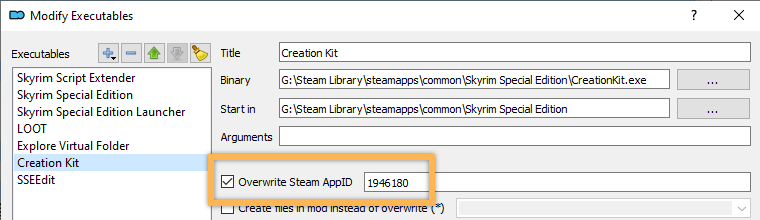
Close and re-open Mod Organizer 2. It should automatically recognise the presence of the Creation Kit which should appear in the executables drop-down.
Before you can run the Creation Kit through MO2, you need to manually add its Steam AppID 1946180 in the executable settings:
MO2 Shortcut
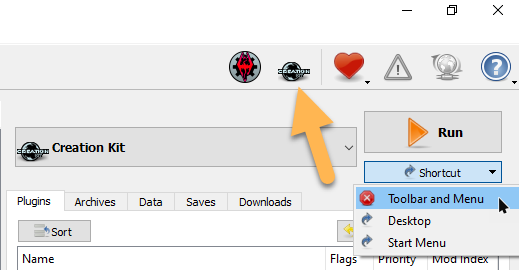
I recommend selecting the Creation Kit from the drop-down and adding a shortcut to the Toolbar for quick access.
Root Builder
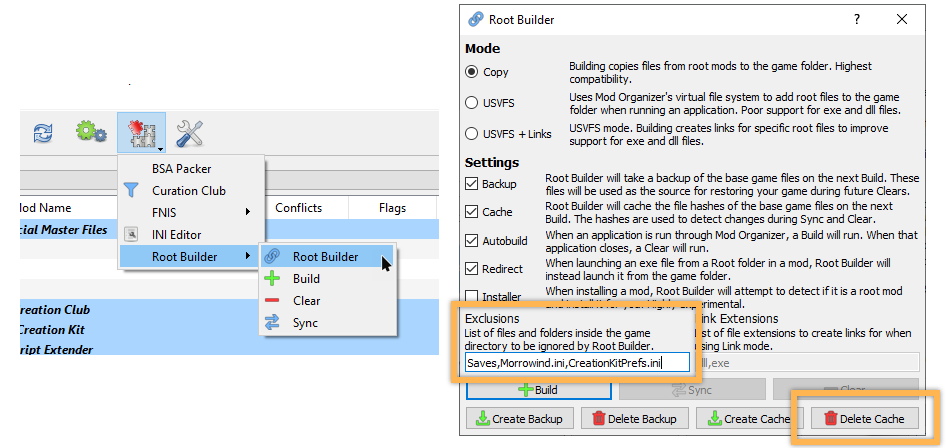
Currently, Root Builder’s cache does not include the CK files which means it will remove them from the root folder when an application is run through Mod Organizer 2. We need to rebuild the cache to solve this.
The CreationKitPrefs.ini will be generated upon launching the Creation Kit and it may change if you change settings in the CK. To prevent Root Builder from tripping up over those changes, I recommend adding it to the list of excluded files.
CK Source Files
Upon launching the CK for the first time, we will get a message to unpack the Scripts.zip in the data folder installed during the CK installation. The archive contains the source files (.psc) for all vanilla scripts (.pex) which are necessary for modifying and recompiling scripts. We can manage these source files using Mod Organizer 2.
In the process of moving the source files into a mod folder, we will also adjust the folder structure. As it happens, the folder structure for scripts and source files changed for some unfathomable reason: In SLE, the file path was \Data\Scripts\Source\ whereas in SSE it became \Data\Source\Scripts\. Not only does the SLE file path make more sense (all vanilla and mod-added scripts are located under \Data\Scripts\), but most source files packaged with mods also still use the old file path.
The Tweaked Creation Kit INI that we are going to install soon will revert the file path for source files back to the SLE one. All that remains is manually fixing the folder structure for the source files.
First, we need to set up a new mod folder with the correct file path:
- Create a new empty mod in MO2 and name it Creation Kit - Source.
- Right-click the new mod and select Open in Explorer.
- Create a new folder called Scripts and open it.
- Create a new folder called Source and open it.
(These are, in fact, data folder files, so no root folder file path is necessary.)
Next, we need to extract the source files:
- Navigate to
\Steam\steamapps\common\Skyrim Special Edition\Data\. - Open the Scripts.zip in the data folder.
- Navigate to
\Source\Scripts\within the archive. - Select all .psc files (CTRL + A) and extract them into the new folder structure:
\Mod Organizer 2\mods\Creation Kit - Source\Scripts\Source\
Back in Mod Organizer 2, refresh the interface (F5) and move the new mod right below the Creation Kit separator.
DialogueViews
For the DialogueViews folder, we can take an easier route.
- Create a new empty mod in MO2 and name it Creation Kit - DialogueViews.
- Right-click the new mod and select Open in Explorer.
- Navigate to the top level within the Scripts.zip archive.
- Extract the DialogueViews folder into the new mod folder.
- Back in Mod Organizer 2, refresh the interface (F5) and move the new mod below Creation Kit - Source.
- Right-click it and select Ignore missing data (the XMLs are not recognised as mod files).
Finally, delete the Scripts.zip from your data folder. Otherwise, the CK will keep bugging you about it.
Improving the CK
There are multiple additional improvements we can install for the Creation Kit.
First, create a new separator in Mod Organizer 2 called Creation Kit. I recommend placing it between the base game files (official master files and creations) and your other mods.
Tweaked Custom INI
Like the base game, the Creation Kit comes with a set of two INI files, CreationKit.ini and CreationKitPrefs.ini, that can be modified directly or overwritten using a CreationKitCustom.ini. We will go with the latter option and grab a preconfigured custom INI from the Nexus.
- Download and install Tweaked Creation Kit INI (click Mod Manager Download).
Mod Organizer 2 will not complain about installing the file as a mod because it recognises the INI as a valid format.
However, the custom INI, like all other CK files, needs to go into the root folder. We need to adjust the folder structure for Root Builder.
- Right-click the new mod and select Open in Explorer.
- Create a new folder and name it Root.
- Drag the CreationKitCustom.ini into the Root folder.
- Refresh MO2 with F5 and right-click the mod » Ignore missing data.
- Move the mod below Creation Kit - DialogueViews and activate it.
Creation Kit Fixes
We previously downgraded the Creation Kit to a previous version to be able to use this mod.
- Download SSE CreationKit Fixes.
- Grab the CK64Fixes Release 3.2 main file and save it to your usual directory.
- Install the mod through Mod Organizer 2.
Once again, we need to adjust the folder structure for Root Builder:
- Right-click the mod and select Open in Explorer.
- Create a new folder and name it Root.
- Drag all files except for the meta.ini into the new folder.
- Refresh MO2 with F5, right-click the mod, and select Ignore missing data.
- Move the mod below Tweaked Creation Kit INI and activate it.
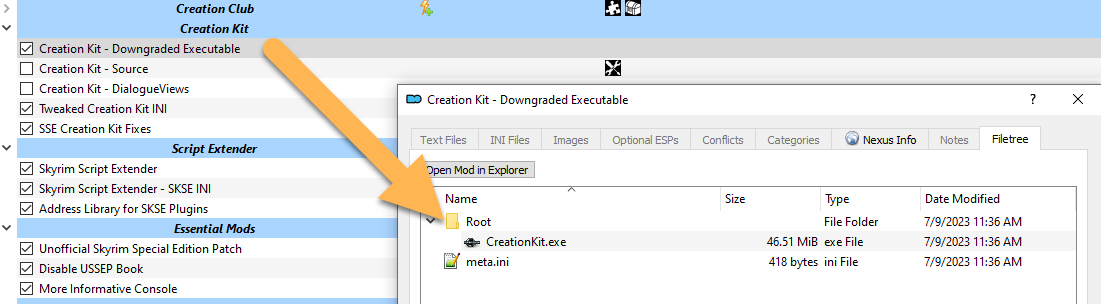
Separate CK EXE
Having a downgraded version of the Creation Kit executable in your root folder should not be an issue for 99% of users. It is, however, an issue for me because I am a Wabbajack list curator and users of my lists would be required to downgrade the CK as a prerequisite for several of my lists if I left the exe there.
To prevent this, I am moving it into Mod Organizer 2 and verify files to restore the current version in the root folder.
Test Run
With everything installed, give the Creation Kit a test run. Launch it through Mod Organizer 2.
Thanks to CK Fixes, starting up the CK should only take a few seconds. If it loads up the main window and if the Overwrite is empty after quitting again, everything was set up correctly.