Regenerating Facegen
Summary
This module covers how to use the Creation Kit to regenerate facegen for all NPCs.
Prerequisite(s): Creation Kit, Synthesis, Cathedral Assets Optimizer
About Facegen
Please check the Facegen article for more information about facegen.
You should regenerate facegen when:
- Changes to Head Parts, Tint Layers, etc, were made in the NPC’s record.
- New meshes for head parts (hair, eyes, mouth) were installed.
- New textures for tint masks (make up, war paints, dirt overlays) were installed.
I recommend regenerating facegen for all NPCs (vanilla and mod-added) as one of the final steps when building a setup. The process is detailed below.
If you only need to regenerate facegen for specific NPCs, please check the instructions at the bottom of this page.
Prerequisites
Before you regenerate facegen please ensure that conflict resolution is completed at least for NPC records. The Synthesis patcher will pull data from the final overwriting record, so if NPC-modifying records are currently being overwritten and reverted to vanilla you would end up with mismatched facegen if you resolved the conflict later.
Any asset replacers for head parts and tint masks as well as any plugins modifying NPC appearance should be installed before regenerating facegen. All mods adding new NPCs should also be installed for perfect consistency across the board.
CK Fixes INI Tweak
By default, the Creation Kit will generate facetint textures of 512x512 resolution which yields small file sizes but looks fairly blurry. The resolution can be increased using SSE Creation Kit Fixes.
- Double-click SSE Creation Kit Fixes in your mod order.
- Switch to the INI Files tab and select the skyrim64_test.ini.
- Modify the following line:
[CreationKit_FaceGen]
TintMaskResolution=1024
You can further increase the resolution to 2048 if you intend to build a setup mostly for screenarchery and closeup pictures. Any resolution above 1024 is overkill for normal gameplay and will generate very large files.
Remember to save your change before closing the window.
*I also added Increased tint mask resolution to 1024. to the Notes tab for the mod.*
Synthesis Patcher
To speed up the process of regenerating facegen for all NPCs that are present, we are going to use a very handy Synthesis patcher by Sr. Kaio made for this express purpose. It will copy all NPC records into a single output plugin which can then be loaded into the Creation Kit for exporting facegen.
- Run Synthesis through Mod Organizer 2.
- Create a new group (see picture) and name it Facegen Helper.

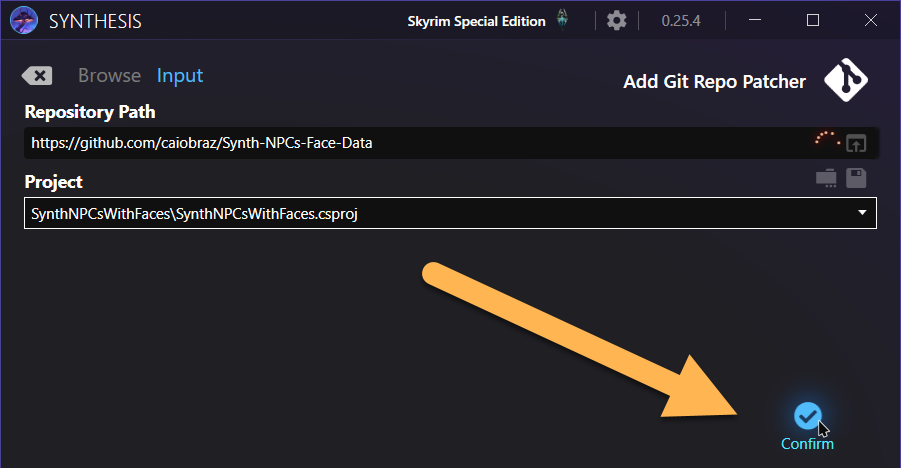
- Add a patcher from Git and switch to Input.
- As the repository link, enter
https://github.com/caiobraz/Synth-NPCs-Face-Data. - Select SynthNPCsWithFaces.csproj from the Projects drop-down.
- Click the blue checkmark to confirm.
Give Synthesis a moment to import the new patcher. Once it is Ready, run the patcher.
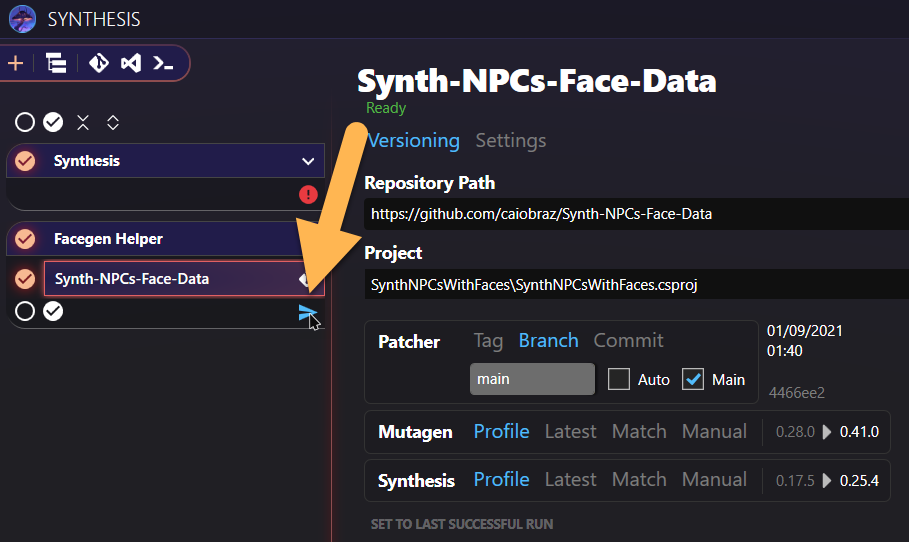
Generating the plugin should only take a few seconds, depending on how many plugins are present.
Close Synthesis when it is done.
Patcher Output
Back in Mod Organizer 2, the newly generated plugin will have been caught by the Overwrite.
- Ensure no other files are located in the Overwrite before right-clicking it and selecting Create mod.
- Name your new mod Facegen Helper and confirm.
I recommend keeping an Outputs separator at the bottom of your mod order and placing the new plugin here.
Exporting Facegen
With the helper plugin in place, we can now jump into the Creation Kit to export facegen.
- Make sure the Facegen Helper plugin is active in the load order.
- Your Overwrite should be completely clean and empty.
- Run the Creation Kit through Mod Organizer 2.
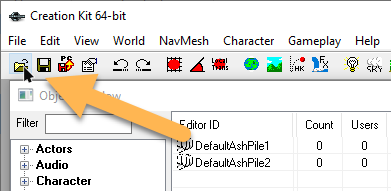
- Click the little folder icon in the toolbar to open a plugin.
- Select Facegen Helper.esp and click Set as Active File.
Confirm and wait for the Creation Kit to load up the plugin. Proceed once it is done.
NPC Records
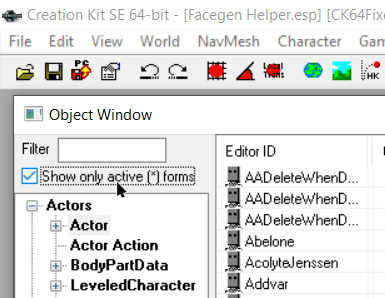
NPC records can be found under Actors » Actor in the Creation Kit where you can see a long list of NPCs that are currently part of the active plugin and any loaded masters.
- Check the box to Show only active (*) forms near the top left in the Creation Kit.
Facegen can be exported by selecting one or several NPCs and pressing CTRL + F4. Now you can go through and select NPCs to export facegen one race at a time.*
**Going one race at a time is a completely arbitrary way of splitting up the sheer amount NPCs so you do not try to export all at once and risk crashing the Creation Kit. You can also go for roughly 50-100 at a time.*
You must skip NordRaceAstrid (between NordRace and NordRaceVampire). Selecting her will break all facegen.
- Sort the NPC records by Race (click the column and feel free to expand it).
- Select the first NPC of a race, press and hold SHIFT, scroll down to the last NPC and select it.
- Press CTRL + F4 to export facegen for all highlighted NPCs and confirm.
For every batch of NPCs you will have to wait a moment for the Creation Kit to process all records.
Close the Creation Kit once you have exported facegen for all NPCs.
Managing the output
At least 16GB of facegen files will now sit in your Overwrite in Mod Organizer 2. To bring down the total file size, I recommend packing all files into BSAs.
- Right-click the Overwrite and select Create Mod.
- Name the new mod Facegen Output or similar and confirm.
- Note that the name will be used by CAO for the BSAs and plugins created in the next step.
- Activate the new mod in the load order.
Creating BSAs
Use the Create BSA profile in Cathedral Assets Optimizer to pack up the assets.
- Open Cathedral Assets Optimizer and select the SSE - Create BSA profile.
- For instructions on how to create this profile, see the link above.
- Click Open Directory and navigate to the mod folder:
\Mod Organizer 2\mods\Facegen Output\. - Select the folder and click Run in Cathedral Assets Optimizer.
Packing 16GB+ worth of assets will take a few minutes and I recommend stepping away in the meantime. You can check the tool’s progress in the log tab.
Finalisation
Once CAO has completed you can close it and return to Mod Organizer 2. Press F5 to refresh the UI.
The loose files will have been replaced with a set of plugins and archives. Make sure the plugins are active in the load order and that assets are overwriting correctly. If you have other BSA-packed facegen that you want to overwrite, place the plugins those BSAs are attached to below the Facegen Output plugins. Loose files will already overwrite.
Disable Facegen Helper. The patch is only necessary for exporting facegen.
Feel free to hop ingame and admire the results!
Regenerating specific facegen
If you only need to export facegen for specific NPCs, you do not need to generate any Synthesis patches. Do be sure that the NPC’s record is not being unintentionally overwritten and modify the SSE Creation Kit Fixes INI as detailed above. Make sure all asset replacers for head parts and tint masks are active as well and delete existing facegen for that NPC.
- Load up the plugin in which the NPC is created in the Creation Kit (this can be a vanilla master file or a mod).
- Find the NPC(s) in question under Actors » Actor and select it/them.
- Hit CTRL + F4 to export facegen and confirm.
Wait for the CK to process everything and close it when it is done.
In Mod Organizer 2, be sure to move the facegen assets out of the Overwrite. You can place them in the original mod’s folder or in a separate one (the latter is recommended because otherwise you have to repeat the process when the mod is updated).