LOD & Occlusion
Summary
This module covers regeneration of Tree and Object LOD with DynDOLOD as well as Terrain LOD and Occlusion with SSELODGen. ACMOS instructions are optionally available.
Prerequisite(s): Mod Organizer 2, SSELODGen, DynDOLOD, ACMOS Road Generator (optional)
Regenerating LODs & Occlusion
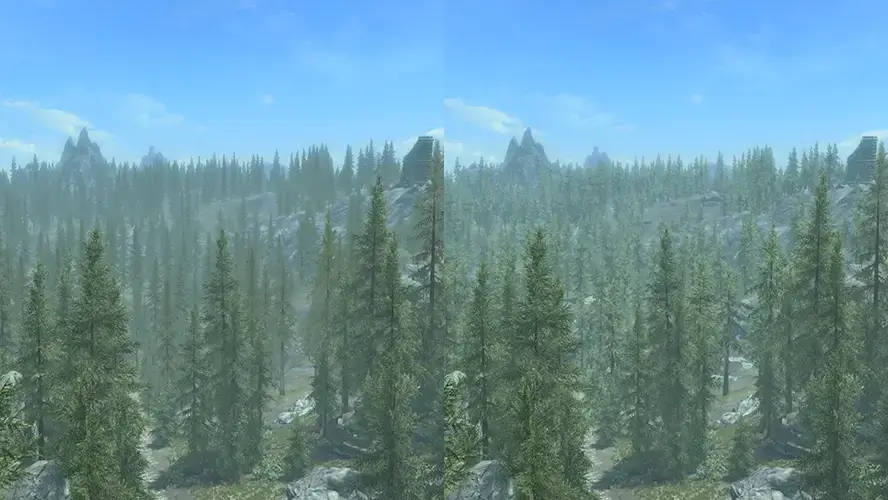
As the final step in building a modded setup, you should regenerate all distant LODs (Terrain, Tree, Object). This will integrate your installed mods so distant terrain will match your close-up landscape textures, distant trees will use the models from your tree overhaul, buildings will be visible at a distance, and so forth.
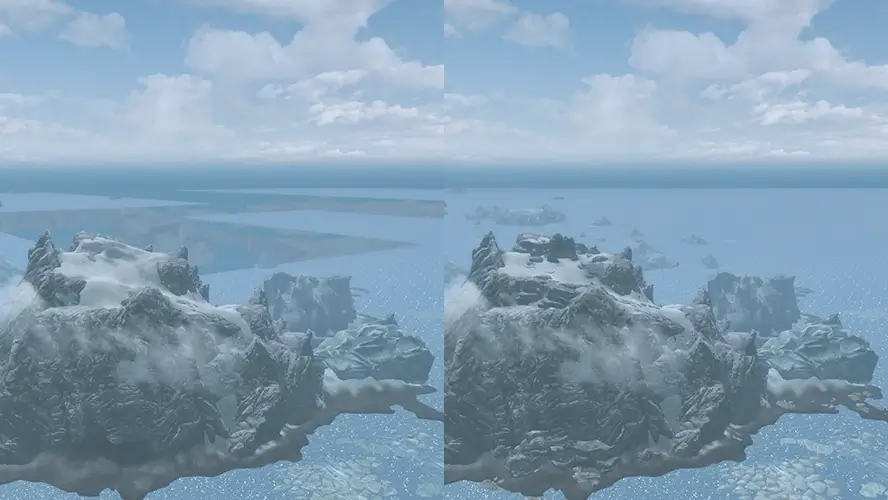
Additionally, I recommend regenerating Occlusion. Occlusion is an optimisation method which unloads parts of the game when they are not visible to the player to improve performance. SSELODGen and DynDOLOD can rebuild Occlusion data for exterior cells so that their LODs are not rendered when the area is hidden from view. This also fixes errors in vanilla Occlusion data such as the infamous hole in the Sea of Ghosts.
All credits for the SSELODGen and DynDOLOD settings go to the STEP team. I have relied on their recommended settings for many years because their testing process is rigorous. You may be able to get better visuals or better performance for your specific combination of mods by experimenting with the settings yourself, but that is very time-consuming.
Overview
The process for regenerating full LODs is somewhat involved and will take a good amount of time. With some routine and if everything goes smoothly you should be able to complete it in 30-60 minutes. If you have many mod-added worldspaces, it may take a little longer.
The following steps must be completed:
- Regenerate Terrain LOD with SSELODGen.
- (Optional) Add roads/paths to Terrain LOD.
- Create billboards with TexGen.
- Regenerate Object and Tree LOD with DynDOLOD.
- Regenerate Occlusion with SSELODGen.
A note on Occlusion: While Occlusion can also be generated with DynDOLOD at the same time as Tree and Object LODs, I find it more convenient to separate the two processes. Unlike DynDOLOD, Occlusion rarely needs to be rebuilt and you will save a lot of time by keeping your existing Occlusion output when regenerating DynDOLOD.
Map Overhauls
Map overhauls require some special treatment when regenerating LODs because it uses uses Terrain LOD meshes and textures (LOD Level 32) which you may not want to overwrite.
In addition, map overhauls also tend to have important modifications to the Tamriel worldspace parent record. Make sure these edits are forwarded into the final layer before regenerating LODs.
When using A Quality World Map or any paper map mod, make sure to place these mods below your SSELODGen Terrain LOD output in the mod order. They must also be present as loose files to overwrite (instructions for unpacking BSAs can be found here).
If you choose not to use a paper world map mod, I strongly recommend A Clear Map of Skyrim and Other Worlds (ACMOS) which utilises SSELODGen and DynDOLOD to drastically improve world map quality.
Instructions for using ACMOS are included on this page.
Seasons of Skyrim
When using Seasons of Skyrim with the relevant resources and related mods, LODs will be generated separately for each season. This means that the generation process will take 5 times as long and produces 5 times as many files.
Seasons of Skyrim support will be added to these instructions at a later date.
Prerequisites
Unless you are creating a temporary set of LOD files for testing, your mod and load order should be finalised before regenerating LODs. This should be the final step.
- If using A Clear World Map for Skyrim and Other Worlds, download the ACMOS Road Generator.
- I strongly recommend also installing Far Object LOD Improvement Project, especially when using ACMOS.
- If using DynDOLOD NG, remember that deleted large references must be undeleted first (cleaning plugins).
Terrain LOD Generation
Terrain LOD is generated with SSELODGen.
Make sure the SSE-Terrain-Tamriel-Extend ESM is activated. You can load the plugin at the top of your ESMs in the load order, right below the official master files and creations.
Also ensure that any other resources for Terrain LOD generation provided by mods are active.
SSELODGen Configuration
Launch SSELODGen through Mod Organizer 2.
- Check all worldspaces (unless you are doing temporary LODs for Tamriel only).
- Make sure only Terrain LOD is checked.
Gamma: Depending on your landscape texture choice, the generated Terrain LOD may be too dark compared to close-up textures. For example, the STEP team sets gamma to 1.25 in combination with Cathedral Landscapes.
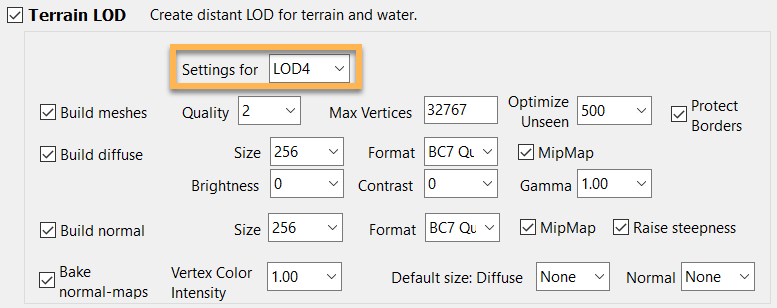
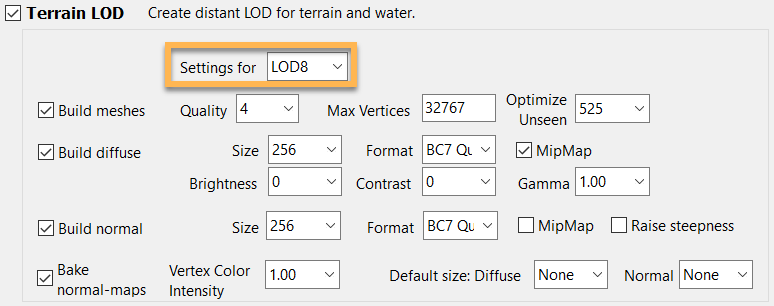
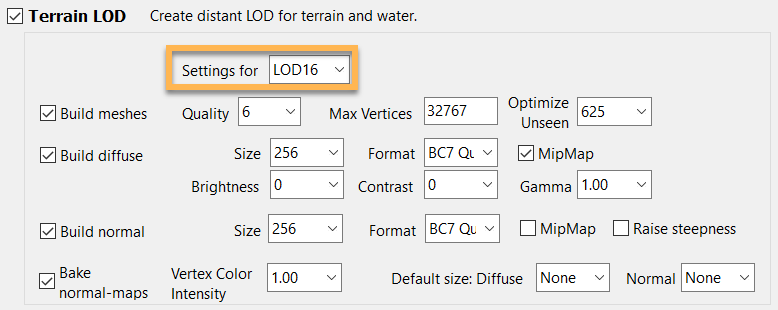
Match the settings below and click Generate.
Settings must be configured for each of the four LOD Levels. Switch between them via the Settings for drop-down.

Roads Generation
If using A Clear Map for Skyrim and Other Worlds, generate roads and paths for the map next.
- Run ACMOS Road Generator.exe.
- Point Path to LOD to where you generated LODs to.
- Output Path should point to the same folder so the existing files are overwritten.
- Set Select Roads to Paths only if you installed FOLIP and Roads if you did not.
- Click Generate and wait for the process to complete.
SSELODGen Output
You can now import your Terrain LOD into Mod Organizer 2.
- Move the Output folder to
\Mod Organizer 2\mods\and rename it to Terrain LOD (or similar). - Press F5 to refresh Mod Organizer 2.
- Place the new mod below the Outputs separator at the bottom of your mod order.
- Activate it.
If you have map mods other than A Clear Map of Skyrim and Other Worlds, ensure that they overwrite your Terrain LOD output. For example, you can remove the conflicting files from the output or place the map mod below it.
Disable all SSELODGen resources. This includes the SSE-Terrain-Tamriel-Extend ESM as well as resources from mods.
TexGen
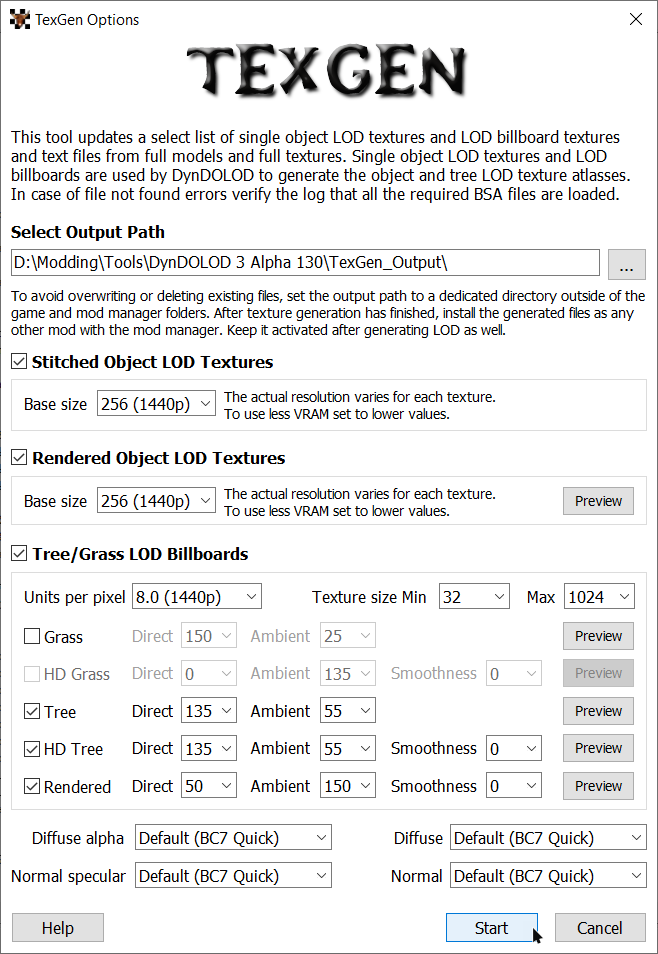
Before running DynDOLOD, we need to generate additional resources with TexGen.
- Run TexGen through Mod Organizer 2.
- The first two LOD Textures options should be checked. Match the resolution to yours.
- For 1080p monitors, use the 1440p option (or 720p if you expect to have serious performance issues).
- For billboard Units per pixel also match your resolution.
- Generate billboards for Tree and Rendered. Also check HD Tree which is required for ultra tree LODs.
- Leave the other settings unchanged and click Start.
TexGen Output
When the process has completed, the output needs to be imported into MO2.
- Locate the TexGen_Output folder under
\Modding Tools\DynDOLOD\. - Move the folder to
\Mod Organizer 2\mods\. - Press F5 to refresh Mod Organizer 2.
- Place the mod below the Terrain LOD output and activate it.
DynDOLOD
Before running DynDOLOD, we need to modify some of the settings:
- Navigate to
\Modding Tools\DynDOLOD\Edit Scripts\DynDOLOD\. - Open the DynDOLOD_SSE.ini in a text editor.
- In Line 11, enable Expert mode by default:
Expert=1. - If using ACMOS: In Line 47, enable LOD Level 32 generation:
Level32=1.* - Save your changes and close the INI file.
**This will enable generation of LOD Level 32 assets for ACMOS for a higher quality world map.*
DynDOLOD Configuration
Run DynDOLOD through Mod Organizer 2.
If using DynDOLOD NG: Make sure the log notes that the Large Ref Bug Workarounds are enabled:

- Check all worldspaces (unless you are doing temporary LODs for Tamriel only).
- Right-click » Select all.
- Check Candles and FXGlow.
- Pick one of the three presets: Low, Medium, or High.
Even on less powerful PCs the Low preset should not have a performance impact. The performance loss from the Medium preset should be negligible on most machines at least matching the recommended specs for vanilla. The High preset obviously has the most noticeable performance impact but also yields solid results.
If you are unsure about the preset, pick Medium and see how it goes. You can always regenerate DynDOLOD later if the performance impact is too much.

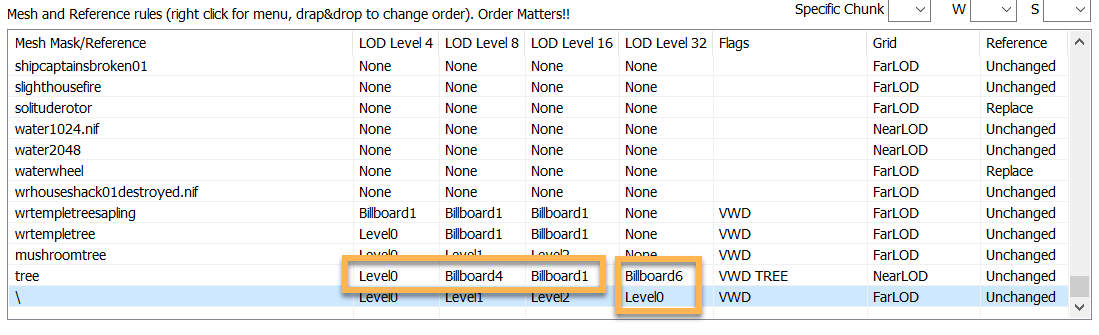
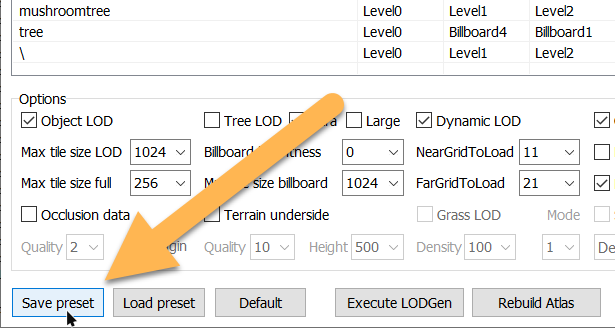
Tree Mesh Rules
The previously select Preset affects the Mesh Rules in the central box. These determine the level of quality for different distant objects, with some (types of) meshes having very specific settings.
- Scroll to the very bottom of the list.
- Double-click the tree mesh rule and apply one of the presets listed below.
The following presets are recommended by the STEP Guide. From my testing, the Best Quality preset is very performance hungry indeed even on strong hardware (@1440p, i7 10700k, RTX 3080, 16GB RAM) and I prefer the Performance/Quality preset. Once again, I would recommend it as a baseline that you can adjust later on.
| LOD Level 4 | LOD Level 8 | LOD Level 16 | |
|---|---|---|---|
| Best Performance | Billboard4 | Billboard4 | Billboard1 |
| Performance / Quality | Level0 | Level4 | Level1 |
| Best Quality | Level0 | Level1 | Level2 |
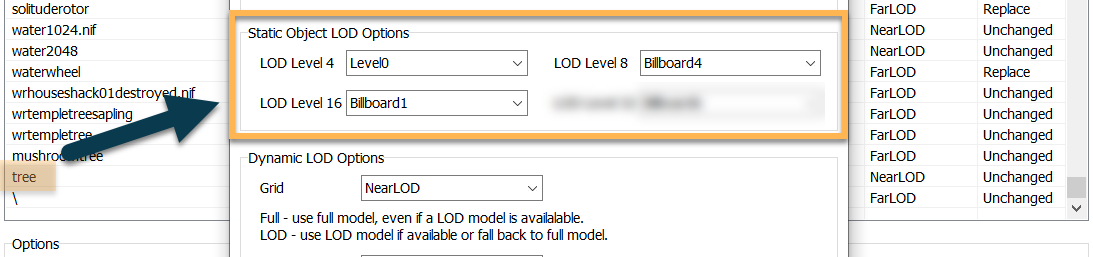
If you are using ACMOS also change the LOD Level 32 settings for the following mesh rules:
- tree to
Billboard6 - / (catch-all) to
Level0
Additional Settings
Follow the instructions below to modify the DynDOLOD settings at the bottom.
- Uncheck Occlusion data. We will generate Occlusion with SSELODGen.
- Check Ultra. This will disable regular tree LOD.
- Check Glow Windows and High.
- Check Upgrade NearGrid References to FarGrid.
- Check Fake lights child world.
If you use DynDOLOD NG also modify the following two options:
- Check Large reference bugs workarounds.
- Uncheck Downgrade FarGrid references to NearGrid.
If you play at 4K increase the resolution of the generated files:
- Max tile size LOD to
2048 - Max tile size full to
512 - Max tile size billboard to
512

Preset
The DynDOLOD configuration resets between runs, but you can change it as a preset to save time. This is optional.
- Click the Save Preset button on the bottom left in DynDOLOD.
I recommend saving the preset not into the DynDOLOD Presets folder but outside of your DynDOLOD installation (for example into the Modding Tools folder). This way, you will not accidentally delete it when updating DynDOLOD.
You can also rename it to reflect your mesh rule preset choice or the specific setup you created it for.
DynDOLOD Generation
After configuring all settings, click Run to start the LOD generation. This may take 10-15 minutes or longer, depending on your settings and the size of your setup.
Once DynDOLOD has completed, it may open an HTML with errors in a browser window. Do not ignore these logs. They can be very helpful for troubleshooting and I suggest you address them immediately, then re-run DynDOLOD.
*I intend to add instructions on how to deal with the most common issues at a later date. Refer to the DynDOLOD documentation in the meantime.*
DynDOLOD Output
When the process has completed, the output needs to be imported into MO2.
- Locate the DynDOLOD_Output folder under
\Modding Tools\DynDOLOD\. - Move the folder to
\Mod Organizer 2\mods\. - Press F5 to refresh Mod Organizer 2.
- Place the mod below the TexGen Output and activate it.
- Load DynDOLOD.esm as the last ESM and DynDOLOD.esp at the bottom of your load order.
Occlusion
Finally, we will generate Occlusion with SSELODGen.
- Run SSELODGen through Mod Organizer 2.
- In the right pane, right-click » Select all.
- Uncheck Terrain LOD and check Occlusion instead.
- Increase the Quality to 3.
The other settings should be left unchanged according to the documentation.
Click Generate and step away while SSELODGen is running. Occlusion generation can be very resource-intense and it is safer not to touch your keyboard until it has completed.

Occlusion Output
When the process has completed, the output needs to be imported into MO2.
- Check the Overwrite in Mod Organizer 2. It should only contain Occlusion.esp.
- Right-click the Overwrite and select Create Mod.
- Name your new mod Occlusion (or similar).
- Place it below DynDOLOD Output and activate it.
- Leave the plugin at the bottom of your load order, right below DynDOLOD.esp.
All LODs have been regenerated! Feel free to jump ingame and marvel at the effect.