Mod Organizer 2
Setup
Mod Organizer 2 is the king of mod managing software for Bethesda games and TPF fully relies on its features. Any claims of MO2 being especially difficult to use are essentially myths perpetuated by inexperienced users. At the end of the TPF setup, you will be able to confidently handling a large mod setup with MO2.
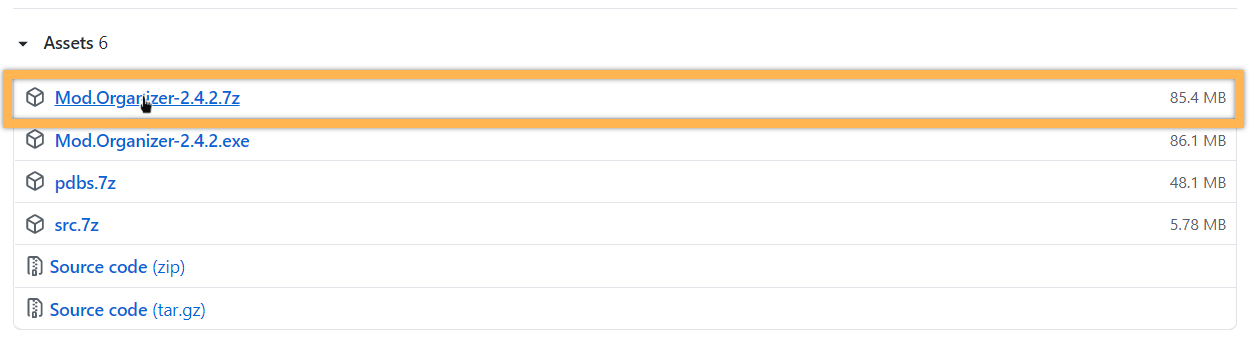
- Download the archive version of Mod Organizer 2 from Github.
Installation
- Extract the archive to a new folder on the same hard drive as your Skyrim SE installation and outside the UAC protected folders.
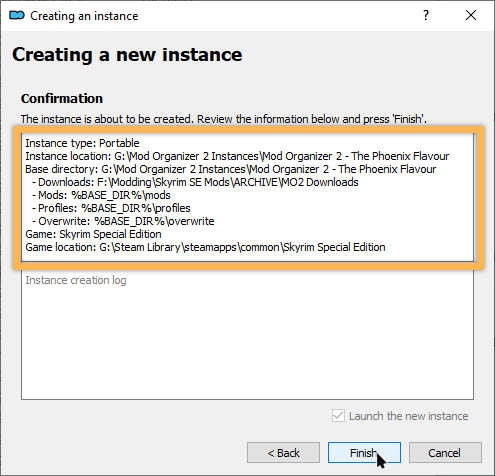
- Run ModOrganizer.exe. Cleck Next and select Create a portable instance.
- Select Skyrim Special Edition in the list of games.
- The Location should already be set to the folder to which you extracted MO2.
- Click Show advanced options.
- Change the Downloads file path to
Your Modding Folder\ARCHIVE\MO2 Downloadsand click Next. - Double-check your configuration and click Finish.
- Confirm when asked to associate NXM links with MO2.
- Click No when prompted with the tutorial option.
Since we changed the Downloads folder, your mod archives will be saved on a less important hard drive. They will not take up space on your SSD where your Mod Organizer 2 instance should be located.
Configuration
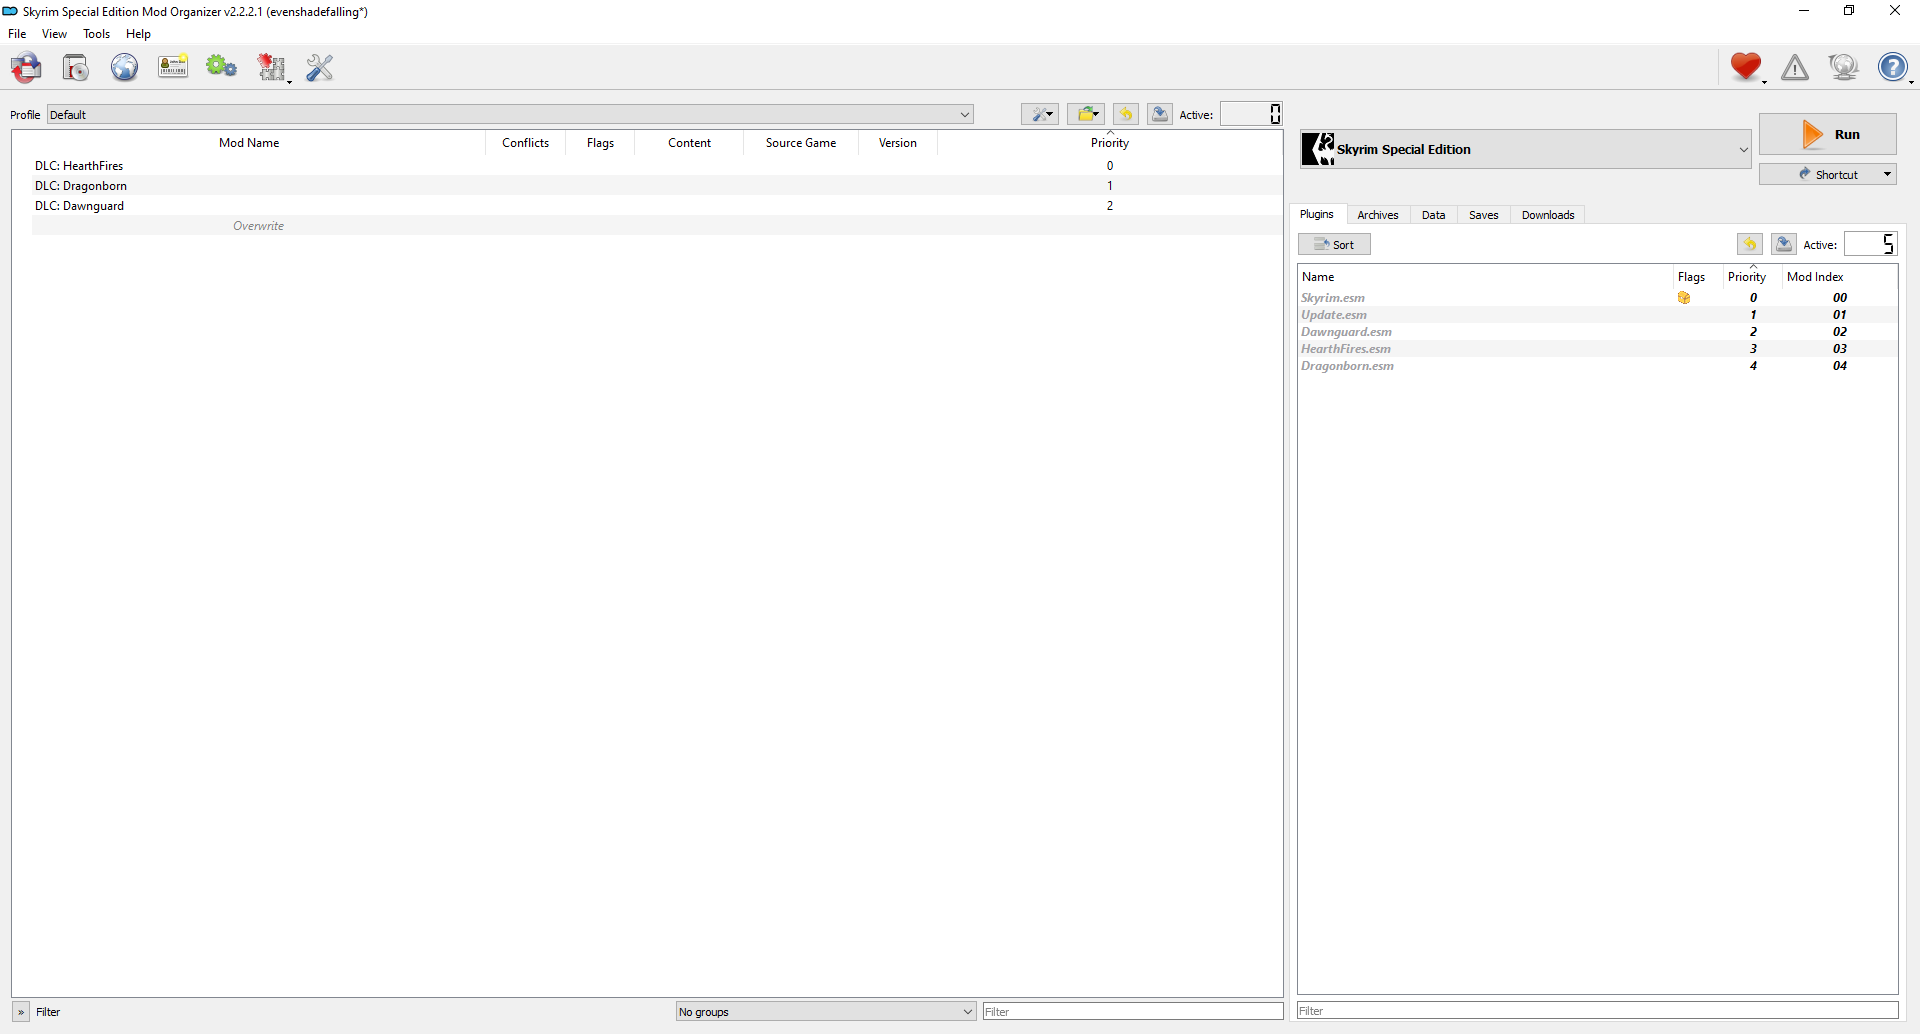
In the mod order (left pane), arrange the DLC as follows:
- DLC: Dawnguard
- DLC: HearthFires
- DLC: Dragonborn
This is, admittedly, not actually necessary. It just bothers me to no end that they are in the wrong order and this is the order you will see them in in my screenshots.
Tweaks
- Open the Settings (Tools » Settings or CTRL + S).
- In the General tab under Download List, check the boxes for Show Meta Information and Compact List.
- Switch to the Workarounds tab and check Enable archives parsing (experimental).
BSA Unpacker
- In the Plugins tab, scroll down to the Plugin section and select the BSA Extractor.
- Double-click only_alternate_source and set it to true.
This will disable the automatic prompt to unpack BSAs upon installing a mod that contains BSAs except for when that mod is from a different source (Skyrim instead of Skyrim Special Edition in this case). Since SLE BSAs must always be unpacked that makes sense.
For all other mods with BSAs, we unpack them too rarely to justify having an extra click for each of them. Occasionally the guide will instruct you to unpack a BSA manually after installing the mod.
Nexus Integration
- Switch to the Nexus tab where you need to connect your Nexus account to Mod Organizer 2.
- Click Connect to Nexus.
- This will open a Browser window where you will be asked to confirm.
- Click Authorise. You can revoke this any time in your Nexus settings.
- Close the Settings window.
- Mod Organizer 2 may ask you to restart. Click OK.

User Interface
You can now configure the UI to your liking. Personally I re-arrange the two panels so that the left one (mod order) is wider.
- Right-click the Tool Bar (coloured icons in the top left).
- Now you may choose which parts of the UI to display. I recommend disabling Log and Status Bar as you won’t need either.
- For the main Tool Bar you can decide between Icons or Text (or both), and, if you choose Icons, their size. This is up to you.
Dark Mode
If it’s the middle of the night and you prefer dark mode to go easy on your eyes, open the Settings (CTRL + S) and choose a different theme under Styles. If I liked dark mode, I’d recommend 1809 Dark Mode.
Mod Order
By right-clicking the top of the left pane, you can choose what to display in your mod order. Enable the following columns:
- Conflicts
- Flags
- Content
- Version
- Source Game
- Priority
Custom Profiles
- Open the Profile settings in MO2 (Tools » Profiles or CTRL+P).
- The Default profile will be selected automatically.
- Uncheck the following option at the bottom:
Use profile-specific Game INI Files
- When asked to delete the existing profile-specific INI files, click Yes.
This profile is completely untouched. It uses the global INI and save files from the Documents\My Games folder, and running Skyrim SE through it will be exactly like running it from Steam.
TPF Profile
- Click Copy to set up a second profile based on the Default one.
- Enter The Phoenix Flavour as the name.
- Select your new profile in the list.
- Check both options at the bottom:
Use profile-specific Save GamesUse profile-specific Game INI Files
- Click Close to exit the settings.
- In the profile list below the top left menu in MO2, select your new profile to switch to it.
This new profile is separate from your vanilla install. It uses its own directory for INIs and save files.

Separators
Mod Organizer 2 offers a separator feature which greatly helps with organising your mod order in the left pane. In the past, the separators were provided to me but I have since been persuaded that users benefit from learning how to create their own.
- In Mod Organizer 2, click the Tools icon above the mod order (see screenshot).
- Select Create Separator and enter “OFFICIAL MASTER FILES as the name.
- Click OK and the new separator will appear at the bottom of your mod order.
- Select your new separator and move it per drag-and-drop above the three DLC.

Colour Customisation
You can change the colour of your separators at any time. A new separator will always have the colour of the one you created previously. You can also have different colours for different sections. Once you have multiple separators, it is also possible to Shift-Click or Control-Click to select any or all of them, and change the colour for all at once.
To change the colour of your first separator:
- Right-click your OFFICIAL MASTER FILES separator and click Select color.
- Change the colour to whatever you want and click OK.
Essential Mods
While we’re at it, we should create another separator which we’ll need in the next step.
- Once again, click the Tools icon above the mod order.
- Select Create Separator and enter “ESSENTIAL MODS” as the name.
- Click OK and your new separator will appear at the bottom of your mod order where you should leave it for now.
Splash Screen
Now comes the final touch: When you open MO2, you can see the default splash screen (the MO2 name and logo) before the app fully launches. Now ask yourself: Can we call ourselves modders if we don’t mod this, too?
- Close Mod Organizer 2.
- Download Mod Organizer 2 Splash Screen - Intro Title Style manually from the Nexus.
- Open the download archive and double-click the Splash - TPF folder inside.
- Drop the splash.png into your Mod Organizer 2 installation folder (the one containing ModOrganizer.exe).
- Re-open Mod Organizer 2 to see your cool new splash screen (and to continue with the guide).
Thanks a ton to sneaky-witch-thief who created the splash screens and added a TPF-themed one specifically for us!