Clean Install
Summary
This module covers how to perform a clean install of Skyrim SE, removing all traces of a previous installation of Skyrim and reinstalling the game in a suitable directory.
Prerequisite(s): None
Uninstalling Skyrim
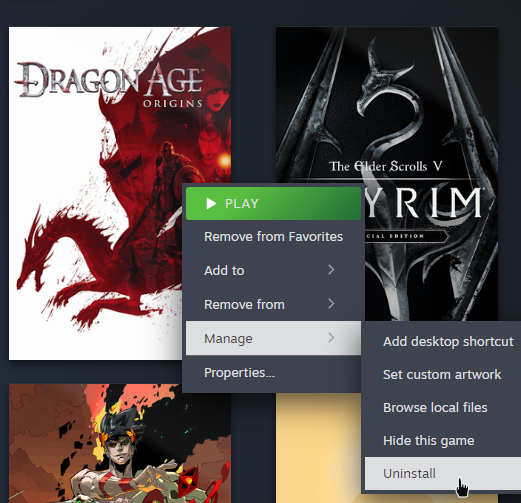
If you currently have Skyrim installed, find the game in your Steam Library.
- Right-click it and select Manage > Uninstall.
- Click Uninstall again in the message box that follows to confirm.
Creation Kit
If you had the Creation Kit for Skyrim SE installed through Steam, uninstall it in the same way.
Mod Files
Steam will uninstall all vanilla files, but it will not touch mods. Any leftover files added by mods must be deleted manually.
Navigate to where the game was installed which is likely:
C:\Program Files x86\Steam\steamapps\common\
If there is still a Skyrim Special Edition folder in this location, delete it.
Documents Folder
Next, we will take a look at the Documents folder. Navigate to:
C:\Users\<Your User Name>\Documents\My Games\Skyrim Special Edition\
This directory may contain multiple files and folders:
- The Skyrim.ini and SkyrimPrefs.ini are the game’s primary configuration files.
- There may also be a saves folder which, you guessed it, contains your save games.
- Lastly, the Documents folder may also include mod-generated files such as logs.
Warning: If you have save files that you want to keep, back them up now.
Delete the entire Skyrim Special Edition folder.
The folder and INI files will be regenerated upon launching the game after the reinstallation.
Game Language
Skyrim supports a bunch of different languages natively, but mods do not. Since many mods also do not require translations in the first place and some of the ones that do have third-party translations available, it is theoretically possible to play modded in Skyrim in a language other than English.
However, it would complicate your setup immensely. Translations, where available, may be outdated or incomplete. They may not cover voice acting. They may require editing of dozens of texture templates in Photoshop. They may not exist for some of your mods at all.
Translating any records (and certain textures!) untouched by existing patches plus fixing conflicts between translations and mods will add a hefty amount of work on top of everything else. I do not recommend it, especially not for a beginner.
An English-language installation of Skyrim is mandatory for this guide.
- Right-click The Elder Scrolls V: Skyrim Special Edition in your Steam games library.
- Select Properties and switch to the Language tab.
- Ensure that the language is set to English.

Installation Directory
The location Skyrim is installed to matters.
For one, it is highly recommended to install the game to your fastest drive, ideally an SSD, which will reduce load times. Running Skyrim from an HDD may negatively impact performance, causing stuttering and frame drops.
Additionally, Skyrim must not be located within any UAC-protected folders.
UAC-Protected Folders
Your Steam installation is probably located under C:\Program Files x86\Steam\ and, by default, all Steam games are installed inside the Steam directory under \Steam\steamapps\common\<Game>\.
The problem is that C:\Program Files\ and C:\Program Files x86\ are so-called UAC-protected folders (UAC = user account control). UAC-protected folders in Windows are special because they require admin privileges for read/write permissions which can break various modding tools.
Because of this, Skyrim SE must be installed to a location outside any UAC-protected folders.
Steam Libraries
When installing a game through Steam, you can select any of your Steam Libraries as the installation folder. The default Steam Library is within the Steam installation itself.
If you installed Steam in C:\Program Files x86\ you will need to create a new Steam Library in a different location.
By default, you can only have one Steam Library per hard drive. If you want to create a second Steam Library on the same hard drive that you installed Steam on, please use LostDragonist’s Steam Library Setup Tool and follow the instructions from the link.
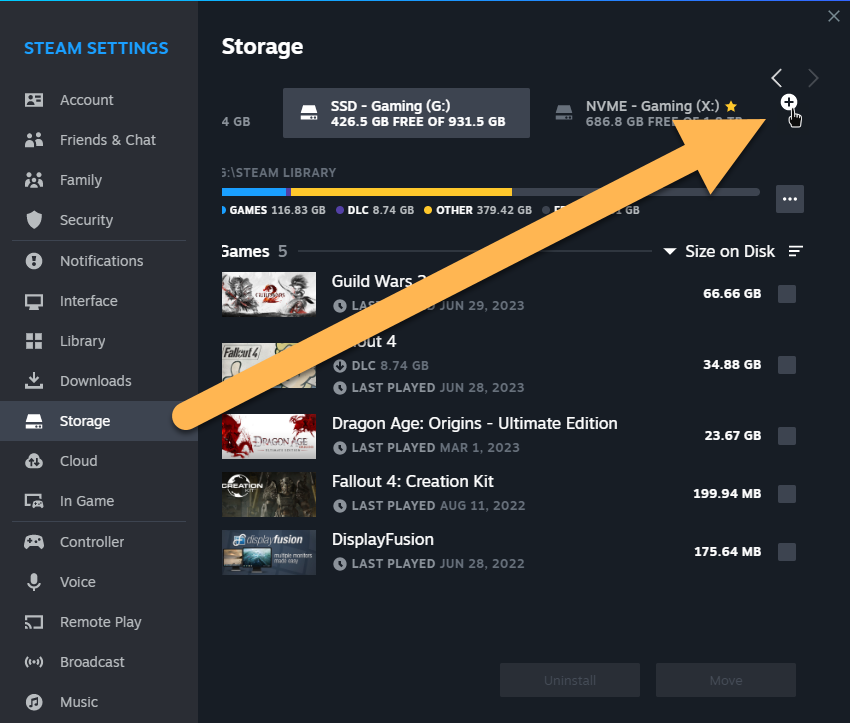
If you want to create a new Steam Library on another hard drive, follow these steps:
- Open the Settings in Steam and go to the Storage tab.
- Find the little ➕ icon near the top to add a new Steam Library.
- Select the desired hard drive.
Once set up, the new Steam Library can be selected as the installation directory upon installing a new game.
Reinstalling Skyrim
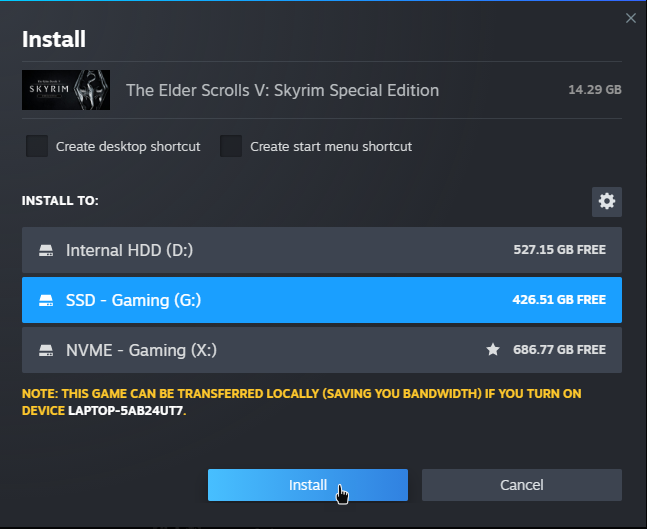
Now you can reinstall Skyrim. Find the game in the Steam Library tab and click the big blue Install button.
As the installation location choose a Steam Library on your fastest hard drive and outside UAC-protected folders.
Proceed when the download is completed.
Test Run
At this point, we should see if Skyrim launches properly. Running the game once serves multiple purposes:
- The
\Documents\My Games\Skyrim Special Edition\folder including its INI files will be regenerated. - The registry keys will be set up which is required for modding tools to recognise your installation.
- Certain issues with your vanilla game can be detected now (i.e., file corruption during the installation).
Always remember to launch Skyrim once after updating or reinstalling it, or after verifying game files.
Launch the game through Steam.
A message box will pop up, informing you that Skyrim SE will now be configured based on your hardware. If Skyrim is unable to detect your hardware, it is likely because you have a newer graphics card which is not recognised; you can ignore the warning.
- Click OK twice to confirm (INI file edits are covered in a different article).
- Click the PLAY option in the launcher and wait until you are in the Skyrim main menu.
Quit the game from the main menu.